
Assessments Guide
In TrustWorks, Assessments help you carry out PIAs, DPIAs, and other privacy evaluations, making it easier to spot risks and demonstrate compliance.
Overview
Creating an Assessment in TrustWorks involves two main stages:
- Survey Creation: Define the questions and structure of the survey.
- Workflow Setup: Configure the sequence of actions and conditions for triggering the survey.
Step 1: Create a Survey
Navigate to Surveys
Go to Workflows → Surveys. Click +New to open the survey builder.

Set Up Your Survey
Name Your Survey
- Provide a clear and descriptive name for your survey.
Select Related Object
- This is crucial. Choose from options like Asset, Processing Activity, or Initiative. This selection determines the context in which the survey will be used.
Add survey description. This will help the respondent get the idea of what is expected.
Add Survey Sections and Questions

Question Types:
- Statement
- Short question
- Multiple choice
- File upload
Smart (Entity-Specific) Question Types
Smart questions pull from or update specific fields on the linked object. When a smart question is answered and approved, the response is written back into the related Asset, Processing Activity, or Initiative.
Asset:
| Question Type | What it updates |
|---|---|
| Categories of Data | Data categories on the Asset |
| Related Processing Activities | Links the Asset to Processing Activities |
| Related AI Use Case | Links an AI Use Case to the Asset |
| Custom Attributes | Custom fields on the Asset |
| Asset Classification | The Classification field on the Asset |
| Provider (Internal / Third-party) | The Provider field on the Asset |
| Related Legal Entity | Links a Legal Entity (e.g. vendor) to the Asset |
| Description | The description field on the Asset |
⚠️ Note: Asset Classification, Provider, and Related Legal Entity questions are not available in vendor-facing surveys.
Processing Activity:
| Question Type | What it updates |
|---|---|
| Data Mapping | Categories of individuals and data categories |
| Purpose of Processing | Purpose field on the PA |
| Lawful Basis | Lawful basis entries |
| Type (Controller / Processor) | Controller/Processor designation |
| Retention Schedule | Retention schedule entries |
| Custom Attributes | Custom fields on the PA |
| Description | Description field |
Initiative:
| Question Type | What it updates |
|---|---|
| Description | Description field |
| Reference Documents | Linked documents |
| Assets or Processing Activities | Linked entities |
| Related AI Use Case | AI Use Case linked to the Initiative |
| Data Mapping | Categories of Individuals + Data Categories on the Initiative |
| Custom Attributes | Custom fields |
Organise and Finalise
Set up the conditional logic (optional)
For multiple-choice questions, you can set up additional logic:
- Enable the Conditional toggle.
- Select conditions (e.g., if "Yes"—go to next section; if "No"—submit survey).

Organise Questions
-
Change the order of questions by dragging them as needed (optional).
Edit or Delete Questions
- Modify or remove questions as needed.
Format
- Use bold, italics, and underline for emphasis
- Add hyperlinks where relevant
- Use bullet or numbered lists to structure content
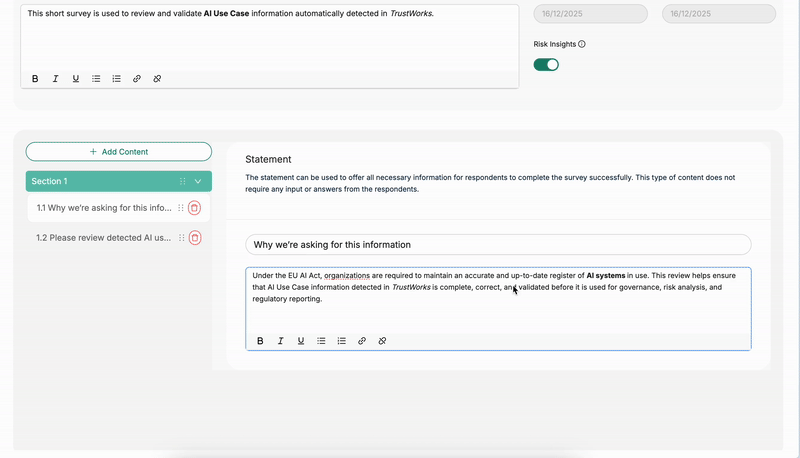
Enable Risk Insights and/or DPIA insights (optional)
- These insights are AI-assisted and will appear once the survey is complete. You can review and import them to the related object during the approval process.

Set up conditional risks (optional):
Enable Conditional risk. Select which risk would correspond to which response(s). You can create a risk from scratch or select one from risk templates library.
For Multiple choice and Custom-field (selector) questions:
- Enable Conditional Risks
- Define Condition: “If respondent selects X…”
- Risk: “Create risk from template Y.” or “Link to manually pre-created risk.

Finalise Survey
- Once you are happy with your survey, change the survey status from Draft to Approved and proceed to save it.
⚠️ Only Approved surveys can be used in Assessments.


Step 2: Create a Workflow for Your Assessment
Navigate to Workflows
-
Go to Workflows and click +New.
Set Up Your Workflow
- Workflow Type: Select Assessments.
-
Related Object: Indicate the entity (one entity per workflow) for which the assessment will be used.
Configure Event Trigger
-
Select Assessment is created as the event trigger.
Define Actions
- Choose the actions to be triggered next, such as:
- Survey
- Send Email
- Send Report
- Task
- Important Step: Select the survey to be sent, assign the respondent (if left blank, the entity's owner is assigned), and optionally, assign a reviewer.
- Assign reviewers and approver (optional)
- Set due date and priority for all tasks/surveys

- Add Additional Steps (Optional)
- You can add more steps like additional tasks or emails.
Finally, make sure that your workflow is set to active . Only active workflows will be able to trigger the assessment.

Running an Assessment
Once your workflow is set up, you can create and run an assessment from any related object, in bulk, or directly from the assessments page.

You can also trigger separate assessments by selecting multiple assignees. Keep in mind these will be individual surveys, not collaborative ones.
This approach isn’t recommended when using smart questions, since each approved survey updates the related object. For example, if a survey includes a ‘purpose of processing’ question and you trigger two individual surveys, each respondent’s answers stay hidden from the others and each approval will overwrite the object’s information.

Pre-Populating Recurring Assessments
When running a recurring assessment — such as an annual vendor review — TrustWorks can pre-fill the new survey with answers from the most recent completed assessment for the same workflow and related object. This saves respondents from re-entering information that has not changed.

How it works:
- When launching a new assessment, if a matching completed assessment exists (same workflow + same related object), a Pre-populate from previous assessment option appears in the launch dialog.
- Select this option to carry forward answers from the previous run. A link to the source assessment is shown so you can review it before launching.
- A brand new assessment run is created — the original assessment is never modified.
- Respondents receive the survey with answers already filled in. They can review, edit, or leave any answer as-is before submitting.
- An indicator is shown on pre-filled questions so respondents know which answers came from the previous assessment.
Important rules:
- Only completed assessments are eligible as a source. Draft, in-progress, and cancelled assessments are not used.
- Answers are matched by question ID, not question order or label — so reordering questions or renaming them between runs does not affect pre-population.
- If a question has been removed from the current survey, its previous answer is not carried forward.
- If a new question has been added, it will be left blank for the respondent to answer.
- If a question type has changed, the previous answer is not copied.
- Smart questions (e.g. data mapping, lawful basis) always display the current live values from the linked object — they do not reuse historical answers.
- Pre-population only works for assessments completed after March 21, 2025. Assessments completed before that date can't be used as a pre-fill source — even if they're otherwise a matching workflow + related object.
Adding collaborators
After triggering a survey, you can invite collaborators in addition to the main respondent. Collaborators are added per survey. Once invited, they receive an email notification and gain access to the survey. They can edit any question, and you can tag them in comments to indicate where their input is needed.
Running Vendor Assessments
Vendor assessments follow the same general setup but require a few additional configuration steps:
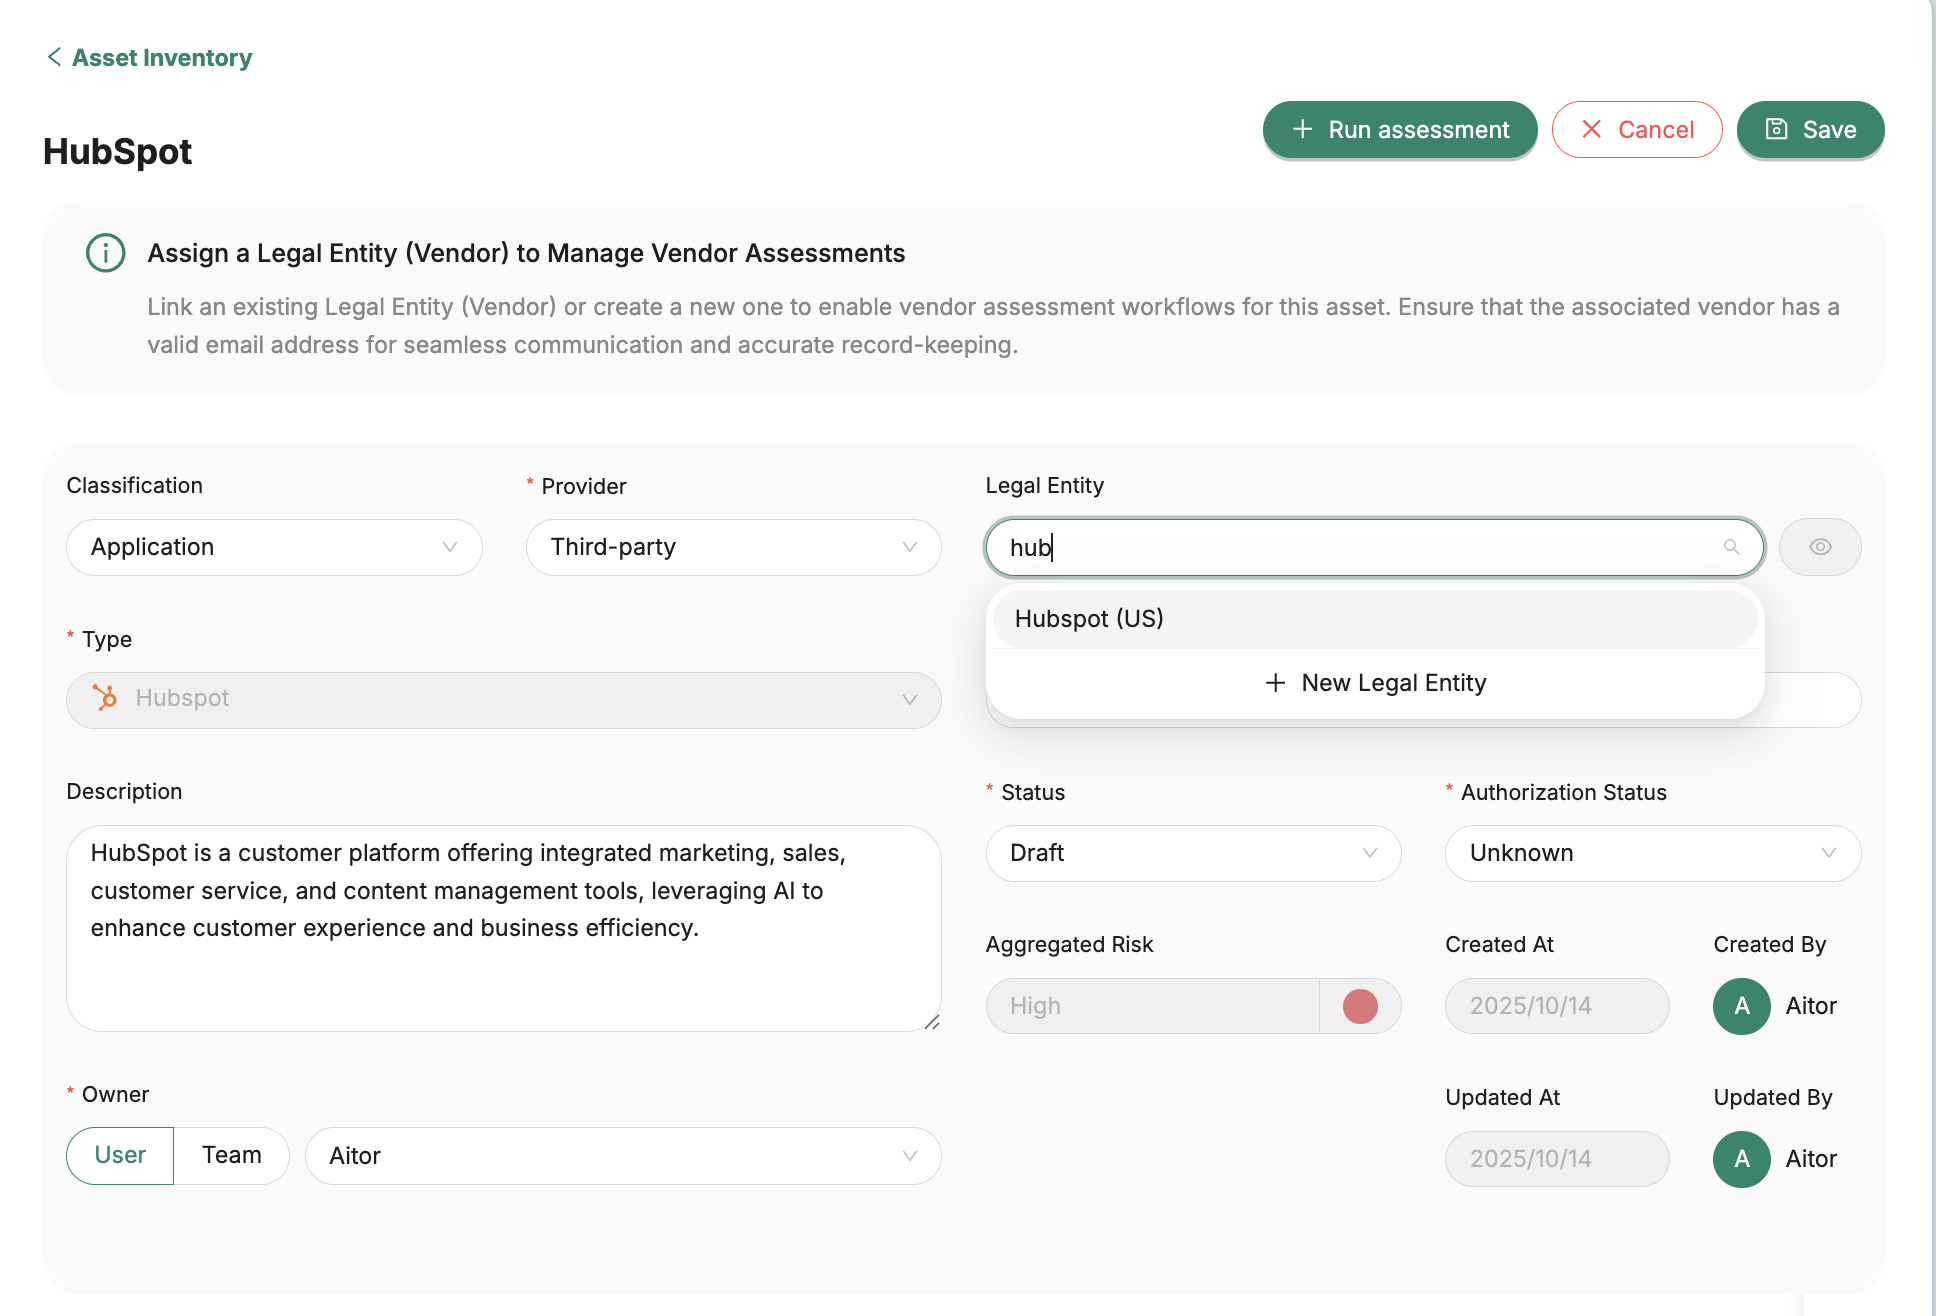
- Link an Asset to a Legal Entity
- Open the relevant Asset representing the vendor-related application or service.
- In the Legal Entity field, link the vendor’s Legal Entity.
- Add the Vendor Contact
- Within the Legal Entity (vendor) details, add the Contact Email for the vendor representative. This is the address where the assessment survey will be sent.
- Optionally you can add additional contacts. They will be invited to participate in a survey too.

- Configure the Workflow
- In the workflow’s Survey Action, set the Respondent as Vendor.
- This ensures the survey is sent to the vendor contact linked to the entity.
- Trigger the Vendor Assessment
- From the Asset page, click + Run Assessment and select the appropriate workflow.
- The linked vendor contact(s) will receive the survey invitation.
💡 Currently, vendor assessments can only be triggered from the Asset context. In upcoming releases, you’ll also be able to run them directly from the Legal Entity view.
Example Use Case
You manage a CRM system linked to an external provider.
- The CRM is registered as an Asset.
- The provider (vendor) is added as a Legal Entity of type Vendor and includes a contact email.
- You create a Vendor Risk Assessment workflow with the vendor as respondent.
- When triggered from the Asset, the vendor receives the questionnaire for completion, and results are linked to that Asset and Legal Entity.
Survey Review
Survey reviewers are set up at the workflow level but can be updated by admins at any point at the survey level (or adjusted at the workflow level if the reviewers change — whether a user or team — needs to be permanent).
Reviewers can mark a survey as "Review Passed," "Review Failed," or "Awaiting Clarification." When submitting their review, users can also optionally add comments. At the question level, reviewers can leave comments, tag @users and #teams, and flag questions that need clarification.
In addition, reviewers can also modify responses and answer survey questions if needed.
Once all reviewers have submitted their feedback, the survey moves to the approval step.
Survey Approval
This is the final step when review and approval has been requested.
The approver can review all feedback from reviewers in the activity log and then decide to approve, reject, or send the survey back to the responder for additional input.
Like reviewers, the approver can also edit responses and add comments.
Once approved or rejected, the survey is closed and can no longer be edited.
Assessments in TrustWorks provide a structured, end-to-end way to evaluate privacy risks across your assets, processing activities, and initiatives. From building a tailored survey and configuring a workflow, to collecting responses, reviewing findings, and reaching a final approval decision — every step is designed to keep your compliance process traceable and auditable.
Once an assessment is approved, any smart question responses are automatically reflected in the related object, keeping your data map accurate and up to date.