
Generic API Integration
On this page
- Overview
- Common use cases
- Requirements and limitations
- Configure the Generic integration
- Using Generic API in workflows
- New workflow builder features
- Customer API gateway
- Best practices
Overview
The Generic API integration lets TrustWorks workflows call external HTTP APIs using configurable requests (method, URL, headers, query params, JSON body). The JSON response can then be used in later workflow steps via templating
It can be used in multiple workflow types:
- DSR workflows (Access, Erasure, etc)
- Template workflows (non DSR), for operational automations and integrations (syncing records, creating objects, enriching data)
Common use cases
DSR
- Access requests: retrieve and return user data from external systems
- Erasure requests: delete or anonymize user data in external systems
Template workflows
- Create or update objects in external systems
- Orchestrate multi-step integrations from webhook triggers (for example request approved flows from procurement platforms). We currently have webhook triggers for Zip and Wrike.
- Enrich TrustWorks objects with data from a source of truth
Requirements and limitations
JSON only
- All endpoints used by the Generic integration must return JSON responses.
Synchronous response requirement
- Generic API requests are executed synchronously as workflow steps.
- Asynchronous processing patterns are not supported.
- Each request must return a JSON response in the same call, within standard HTTP timeouts.
- Endpoints that only acknowledge receipt and then process asynchronously are not sufficient on their own.
Retries and failures
- If a request fails, you can retry it up to 3 times.
- After 3 failed attempts, the workflow step will require manual completion.
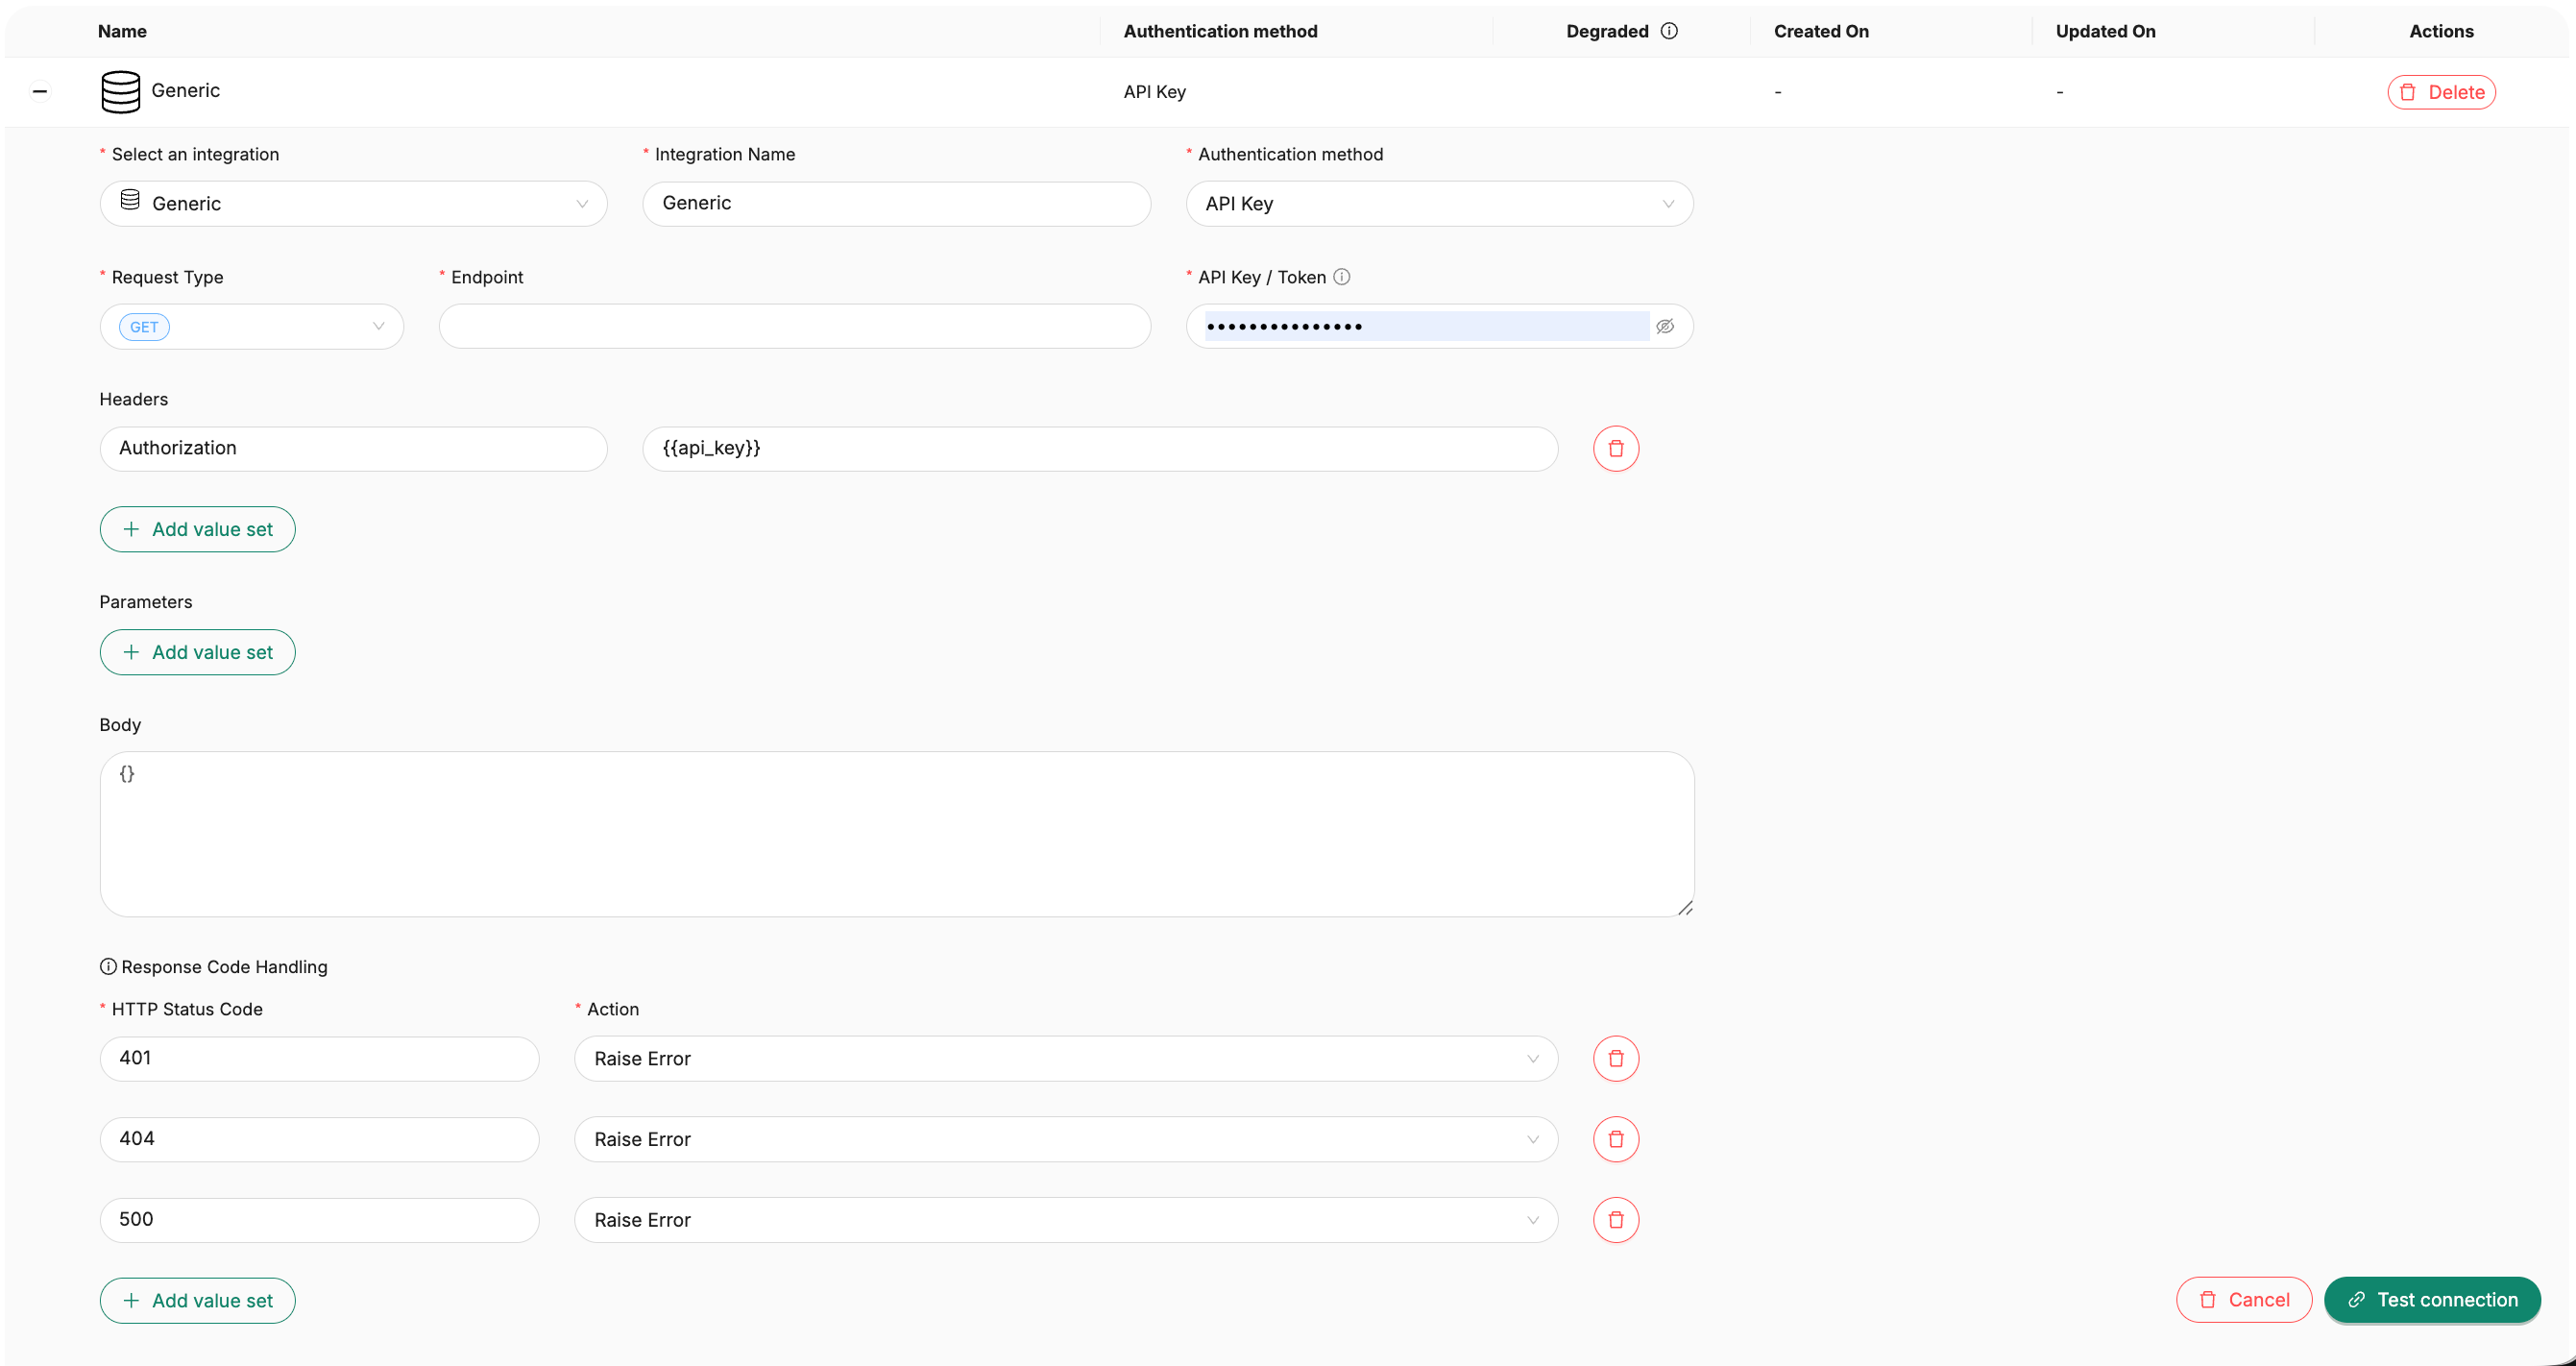
Configure the Generic integration
- Create the integration
- Go to Settings → Integrations → New Integration
- Select Generic
- Give it a name and save
- Configure authentication
- Choose API Key:
-
When the target API uses a static token.
- Typically passed via the Authorization header, but you can change the header name or add additional headers as needed.
-
- Choose OAuth 2.0:
- When the target API requires OAuth 2.0.
- Endpoints
- Authorization URL (required)
- Exchange Token URL (required)
- Refresh Token URL (optional)
- Scopes (required)
- Credentials
- Client ID (required)
- Client Secret (required)
- Redirect URL (read-only):
https://app.trustworks.io/integration/callback -
Then click Connect with Generic to complete the OAuth connection.

- Endpoints
- When the target API requires OAuth 2.0.
- Choose API Key:
- Configure the validation request (test connection)
- Use a lightweight endpoint that reliably returns 200 and JSON, such as /health, /status, or a simple identity endpoint.
- Configure headers and query parameters required by the endpoint.
- If using GET, you usually do not need a request body.
- If using POST or another method, use a JSON body.
-
Once tested, it’s important to save the integration.


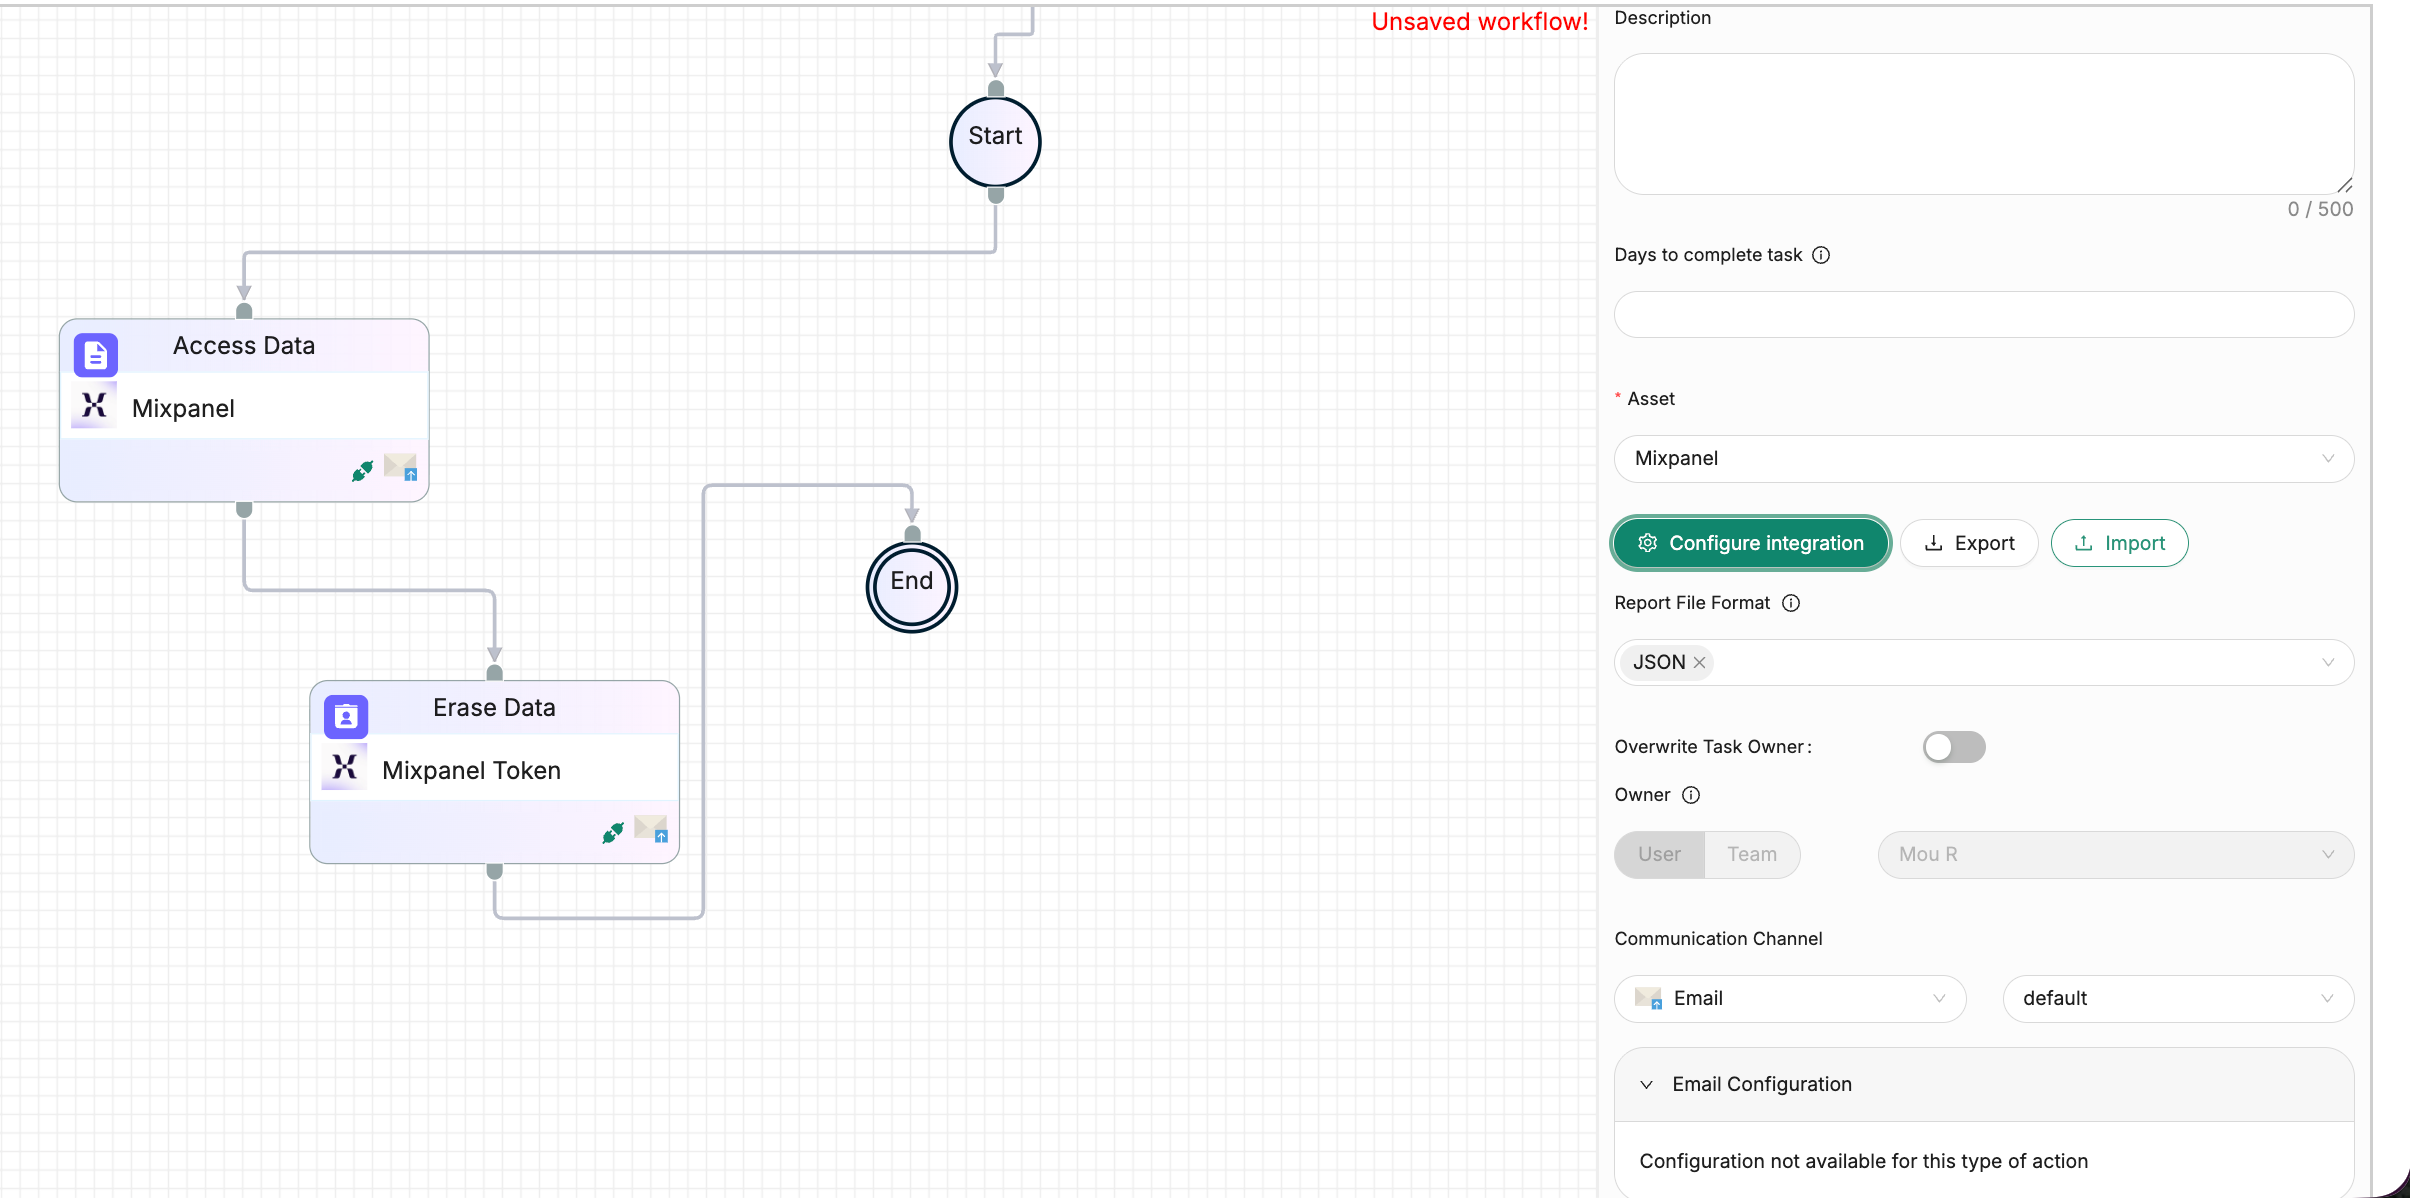
Using Generic API in workflows
DSR workflows (Access Data, Erase Data)
High level flow
- Create or select an asset
- Link the Generic integration in the asset automation details and enable it

- In a DSR workflow, add Access data or Erase data actions and select that asset
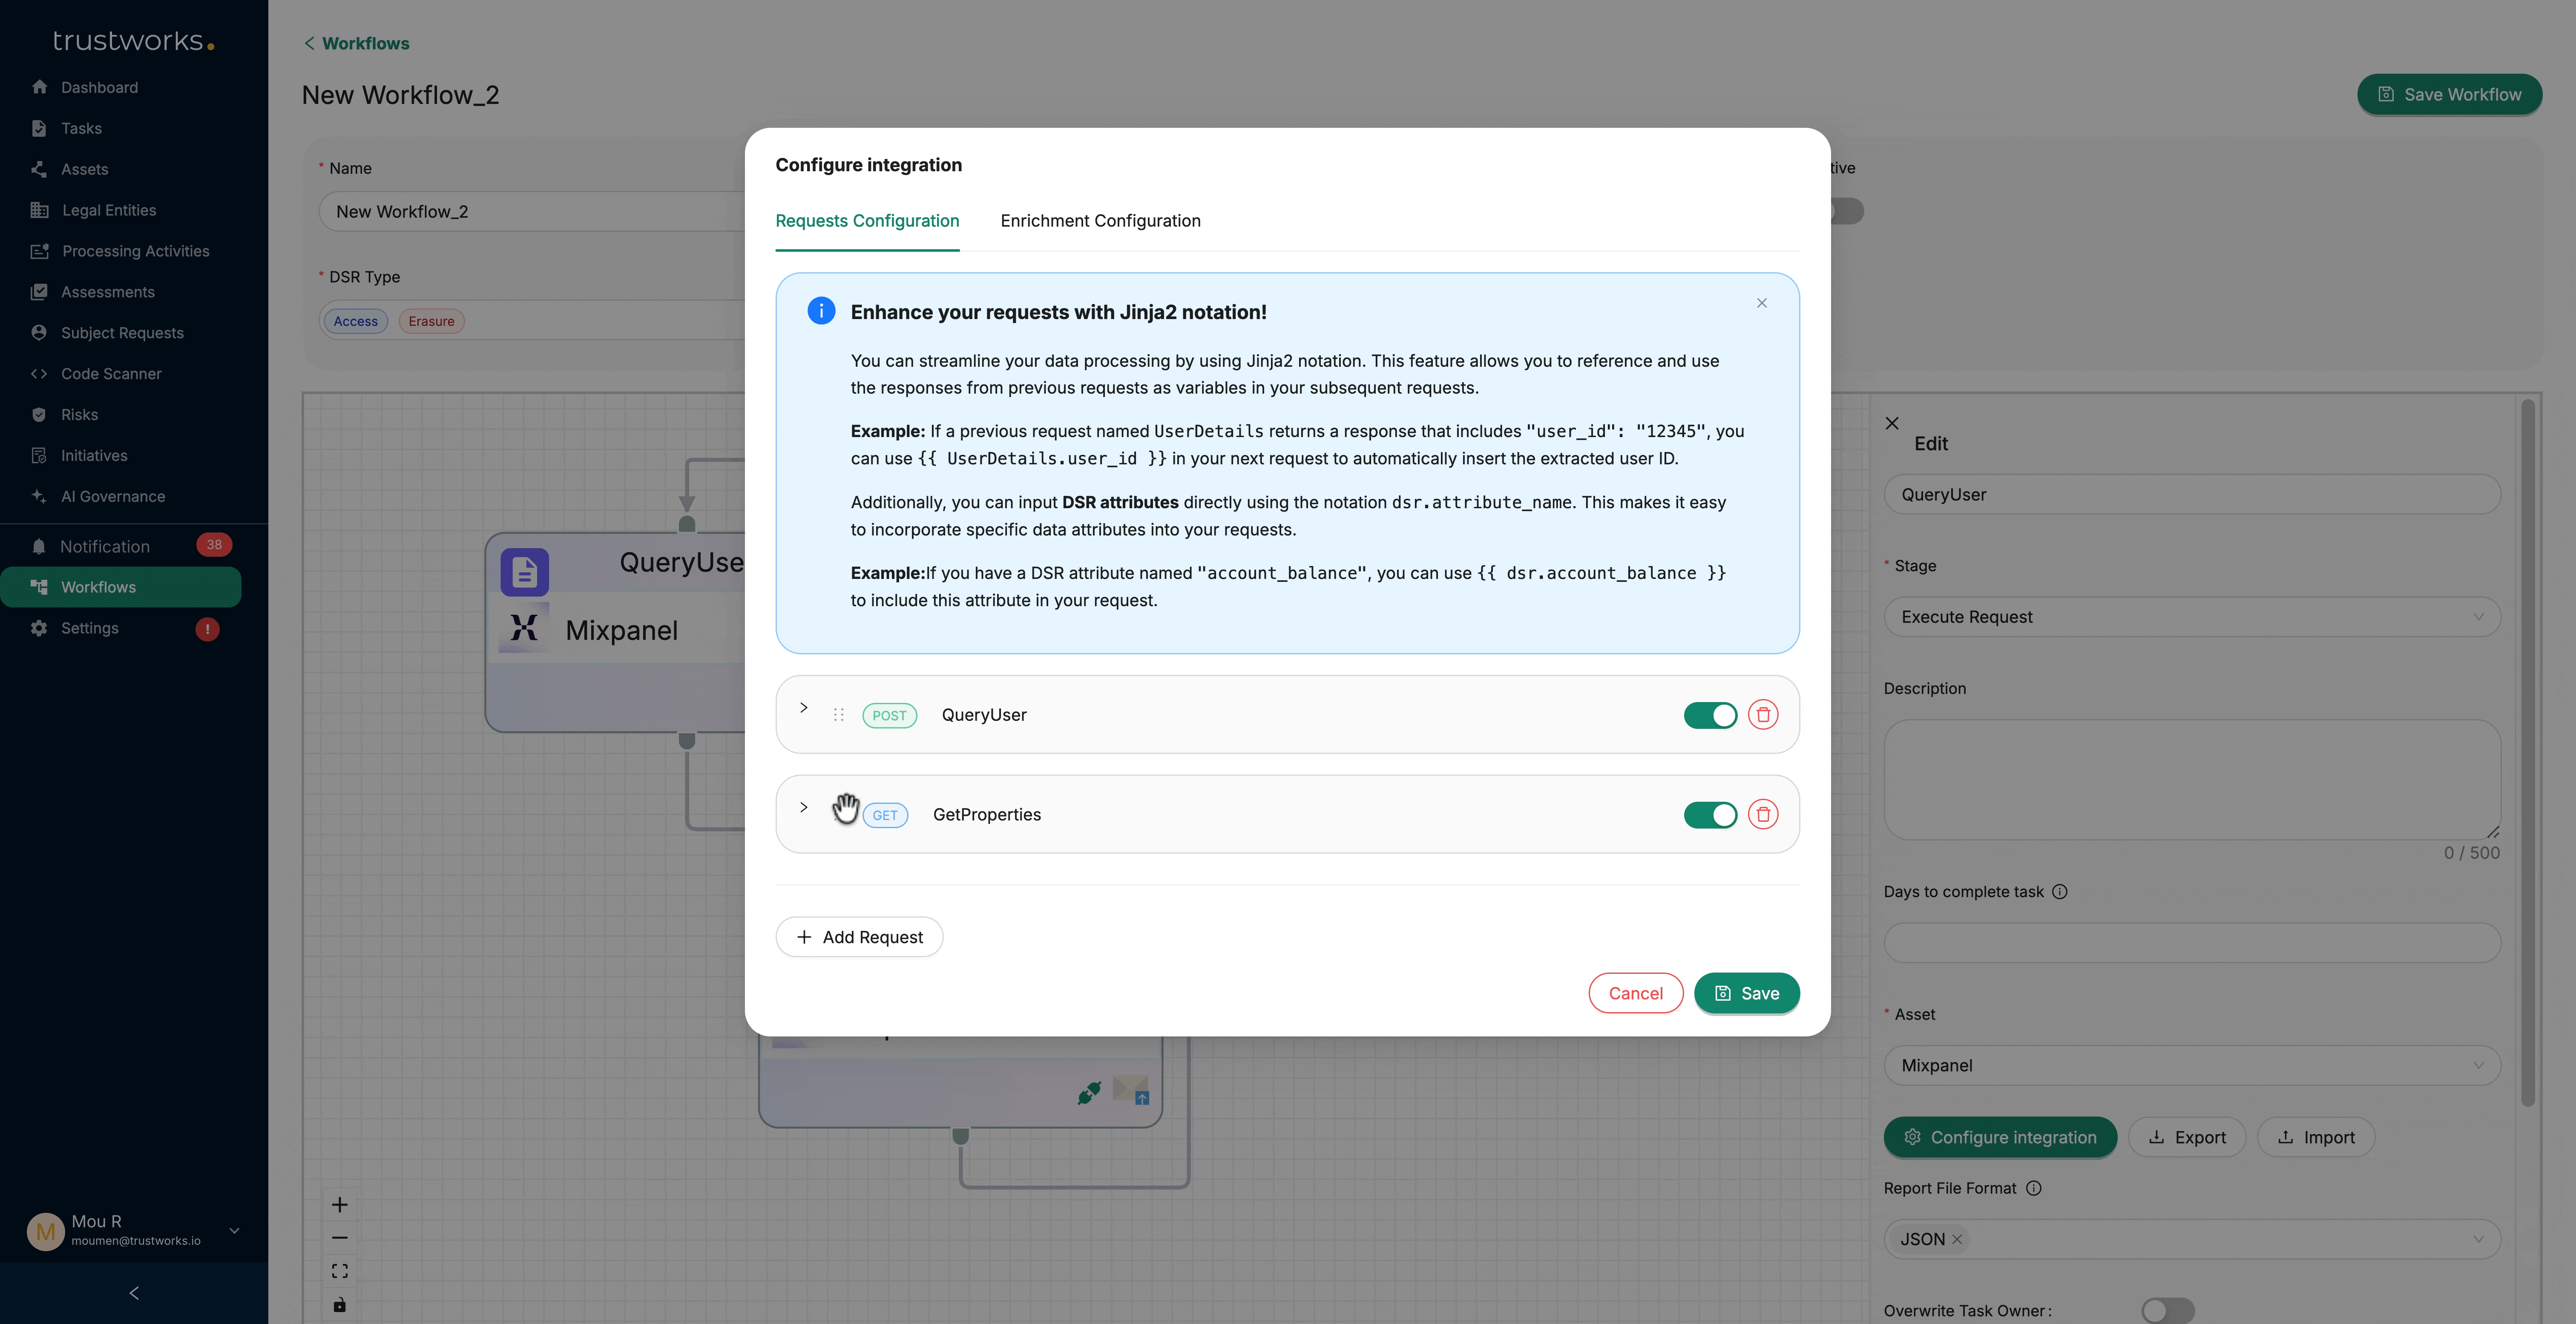
- Configure one or more requests inside the action
Templating and chaining
- Requests support Jinja2 templating.
- You can reference DSR fields such as
{{dsr.email}} - You can reference previous request responses in later requests. The request name matters because it is used to reference the prior response.
- If a request returns a list/array, reference items by index (example:
{{ FindUser.users[0].id }}
Example: Zendesk erasure DSR with Jinja2 enrichment
This example shows how to run an erasure DSR when the downstream API expects a user ID (not email), and when you must handle related objects (tickets) before deletion.
Workflow setup
- Workflow type: Data Subject Request
- DSR type: Erasure
- Subject type: Candidate
- Trigger: When Data Subject Request is created (runs when a DSR is created directly in TrustWorks)

Prerequisites
Create these Subject Attributes (Settings → Data Subject Request → Subject Attributes):
- Zendesk_User_ID
- Zendesk_Ticket_IDs
Why Subject Attributes
- The DSR gives you dsr.email.
- Zendesk endpoints in this flow need a user ID and, for ticket operations, a comma-separated list of ticket IDs.
- Subject Attributes let you persist values extracted from earlier HTTP responses and reuse them in later actions.
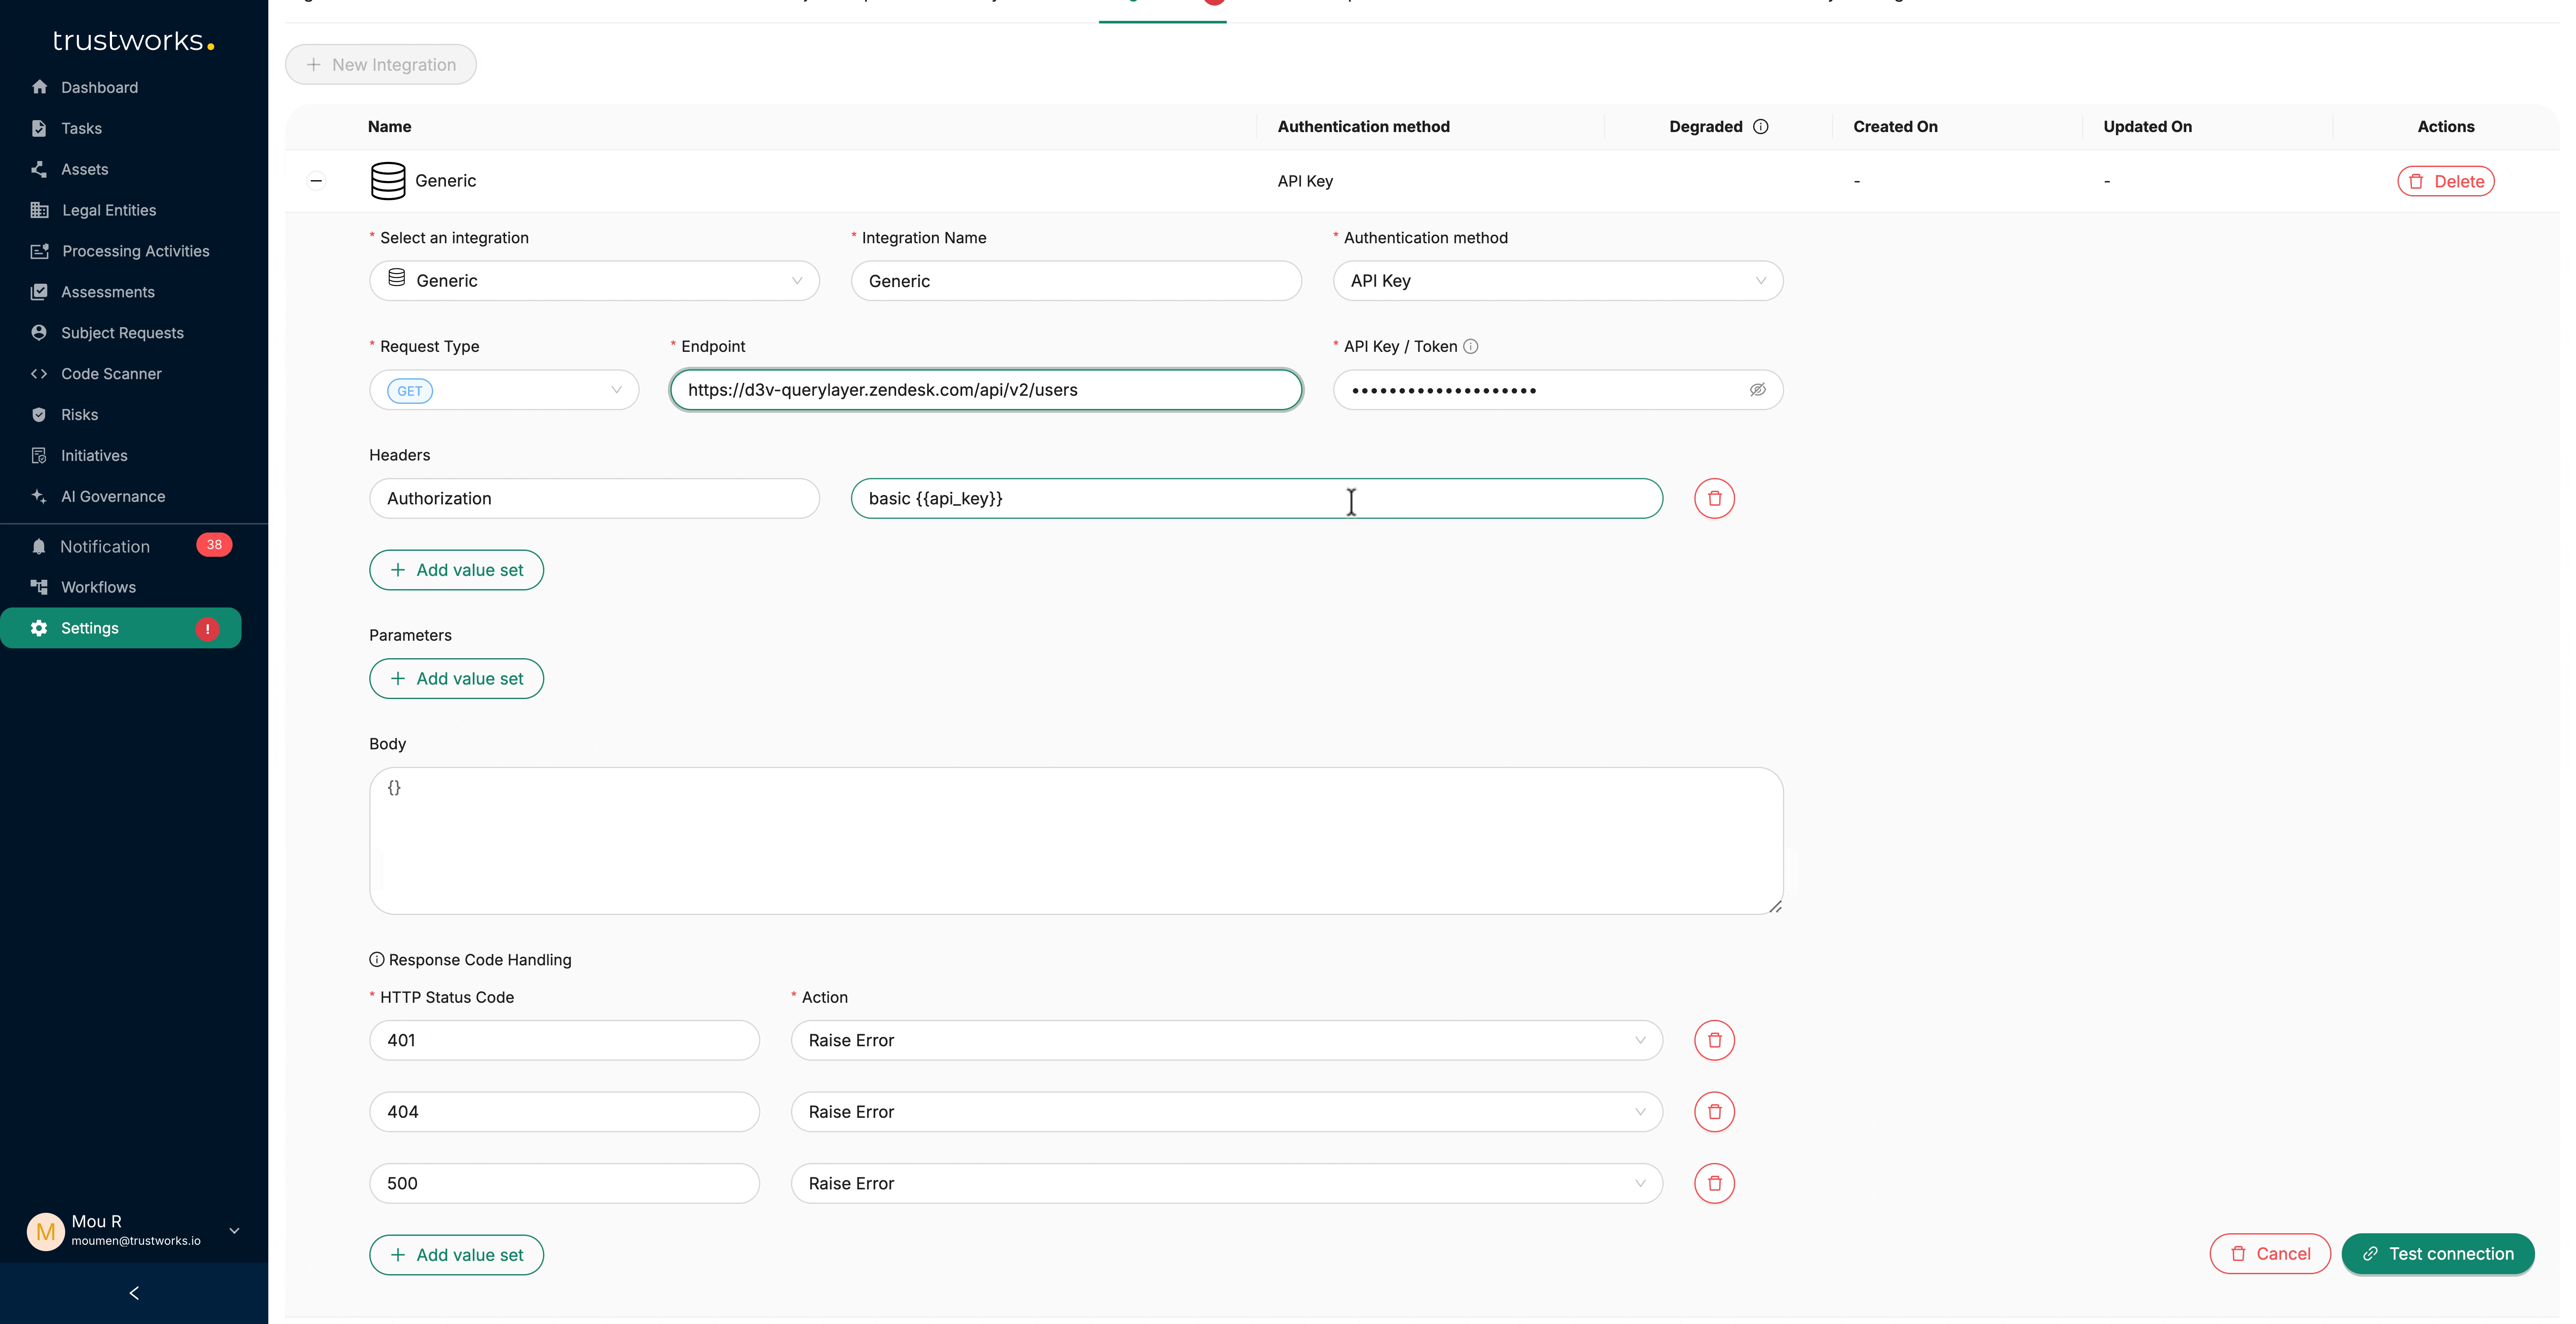
Step 1: Find the user ID from the DSR email (Access Data action)
Goal: convert dsr.email into the Zendesk user ID.
Request: FindUser
- Method: GET
- Endpoint:
https://YOUR_SUBDOMAIN.zendesk.com/api/v2/users/search - Headers:
- Authorization: basic
{{api_key}}
- Authorization: basic
- Query parameters:
- query:
{{dsr.email}}
- query:
- Response code handling (example):
- 401 → Raise Error
- 404 → Skip
- 500 → Raise Error

Enrichment configuration
- Subject Attribute: Zendesk_User_ID
- Value:
{{FindUser.users[0].id}}

Notes
- The users/search endpoint returns an array of users, hence users[0].id.
Step 2: List the user’s tickets and store ticket IDs (Access Data action)
Goal: retrieve the ticket IDs linked to the user so they can be closed before deletion.
Request: ListTickets
- Method: GET
- Endpoint:
- Headers:
- Authorization: basic
{{api_key}}
- Authorization: basic

Enrichment configuration
- Subject Attribute: Zendesk_Ticket_IDs
- Value:
{{ ListTickets.tickets | map(attribute='id') | join(',') }}

Notes
- This extracts all ticket IDs from the response and stores them as a comma-separated string, ready to be used as the ids parameter in the next step.
Step 3: Close the tickets (Access Data action)
Goal: tickets must be closed before deleting the user in Zendesk.
Request: CloseTickets
- Method: PUT
- Endpoint: https://YOUR_SUBDOMAIN.zendesk.com/api/v2/tickets/update_many.json
- Headers:
- Authorization: basic
{{api_key}} - Content-Type: application/json
- Authorization: basic
- Query parameters:
- ids:
{{dsr.Zendesk_Ticket_IDs}}
- ids:
- Body:
 {
"ticket": {
"status": "closed"
}
}

Enrichment configuration
- None required for this step.
Step 4: Soft delete the user (Erase Data action)
Goal: perform the initial delete step required before permanent deletion, to adhere to GDPR deletion expectations.
Request: DeleteUser
- Method: DELETE
- Endpoint:
- Headers:
- Authorization: basic
{{api_key}}
- Authorization: basic

Step 5: Permanently delete the user (Erase Data action)
Goal: permanently delete the previously deleted user.
Request: PermaDelete
- Method: DELETE
- Endpoint:
- Headers:
- Authorization: basic
{{api_key}}
- Authorization: basic

What happens after the erasure workflow completes
Once all steps in the erasure workflow have executed successfully, TrustWorks automatically sends a confirmation email to the Data Subject via the Send Report action, confirming that their data has been deleted.
The content of this email can be viewed and edited by going to:
- Settings → Email Templates
- Search for “Erasure Request Completed”
This email is sent automatically as part of the erasure workflow and does not require additional configuration in the Generic API actions.
Report file formats (Access Data only)
- For Access Data actions using Generic API, you can choose the report file format:
- JSON (default)
- CSV (multiple files)
- Excel
- This controls the format of the downloadable files the data subject receives in their confirmation email (via a download link). The content of this email can be viewed and edited by going to Settings -> Email Templates and searching for "Access Request Completed".
- This setting is only relevant for Data Subject Access Requests.

Using Generic API in Template workflows (non DSR)
When to use
- You want to call an external API as part of a workflow that is not a DSR (for example, provisioning, syncing, or creating records).
- You want to trigger a workflow from a webhook and orchestrate actions in external systems.
Trigger support
- Webhooks are currently supported for Zip and Wrike. Available events depend on the integration (for example request.submitted, request.approved)
Example: Template workflow triggered by Zip webhook that creates records in TrustWorks
This example shows a Templates workflow that listens to a Zip webhook and then calls the TrustWorks public API (via Generic HTTP requests) to:
- Look up an existing Legal Entity by name
- Create the Legal Entity if it doesn’t exist
- Create an Asset linked to that Legal Entity
- Run an Assessment against the created Asset
Workflow setup
- Workflow type: Templates
- Related object: Asset
- Trigger type: Webhook
- Webhook integration: Zip
- Event: request.submitted

The webhook payload is available in the workflow as event_data and is used to populate request bodies.
Step 1: ListLegalEntities (HTTP request)
Goal: check if a Legal Entity already exists for the vendor in the Zip request, to avoid duplicates.
Request: ListLegalEntities
- Method: GET
- Endpoint: https://api.trustworks.io/v1.0/legal-entities
- Headers:
- x-tw-api-key:
{{api_key}}
- x-tw-api-key:
- Query parameters:
- page_size: 500
- name:
{{ (event_data.data.vendor.name | default(event_data.data.name) | trim) }}
Response code handling (example)
- 401 → Raise Error
- 404 → Skip
- 500 → Raise Error

Output used later
- This request returns a list of matching records. Later steps take the first match (if any) using:
ListLegalEntities.records | default([]) | first
Step 2: CreateLegalEntity (HTTP request)
Goal: create a Legal Entity only if Step 1 did not return an existing record.
Request: CreateLegalEntity
- Method: POST
- Endpoint: https://api.trustworks.io/v1.0/legal-entities
- Headers:
- x-tw-api-key:
{{api_key}}
- x-tw-api-key:
Body behaviour (Jinja2)
- Runs only when
event_data.event_type == "request.submitted" - Sets:
target_namefromevent_data.data.vendor.name(fallback toevent_data.data.name), trimmed.- existing from Step 1:
- existing =
(ListLegalEntities.records | default([]) | first)
- existing =
- If existing is empty, it creates a new legal entity with:
- name: {{ target_name }}
- type: "vendor"
- status: "active"
- description: "Created from Zip request {{ event_data.data.id }}"
If existing is present, the body resolves to {} (no create).

Step 3: CreateDataRepository (HTTP request)
Goal: create an Asset (data repository) and associate it to the Legal Entity.
Request: CreateDataRepository
- Method: POST
- Endpoint: https://api.trustworks.io/v1.0/data-repositories
- Headers:
- x-tw-api-key:
{{api_key}}
- x-tw-api-key:
Body behaviour (Jinja2)
-
Runs only when
event_data.event_type == "request.submitted"Determines the Legal Entity ID (
le_id) using:CreateLegalEntity.idif a new legal entity was created- otherwise falls back to
existing.id from Step 1
- Creates the asset (data repository) payload only if
le_idis present. - Includes:
- legal_entity_id:
{{ le_id }} - external_id:
{{ event_data.data.id }} - status: "draft"
- authorization_status: "unknown"
- owner derived from the Zip requester or creator
- legal_entity_id:

Step 4: RunAssessment (HTTP request)
Goal: run an assessment workflow against the newly created Asset.
Request: RunAssessment
- Method: POST
- Endpoint: https://api.trustworks.io/v1.0/assessments
- Headers:
- x-tw-api-key:
{{api_key}}
- x-tw-api-key:
Body
{
"workflow_id": 9,
"data_repository_id": {{ CreateDataRepository.id }},
"related_entity": "data_repository"
}

Notes
- You can get the
workflow_idby going to Workflows -> select the assessment workflow you would like to trigger, and grab the id from the link.
New workflow builder features
Export and import of HTTP configurations
-
In the workflow action configuration for Generic API requests, you can export the HTTP configuration and import an HTTP configuration.
- This helps copy the same request setup across environments or workflows.

Reordering HTTP requests
- Within the Configure integration modal, HTTP requests can be reordered.
- This matters when later requests depend on earlier responses through Jinja2 variables.
- Reordering lets you change execution order without deleting and recreating requests.
-

Customer API gateway
Some customers prefer TrustWorks to call a customer-owned API gateway instead of connecting directly to each downstream tool.
Generic API can connect to a customer API gateway as long as the gateway:
- Exposes HTTPS endpoints that return JSON
- Supports authentication via API Key or OAuth 2.0
- Returns final results synchronously for each request (not accept-and-process asynchronously)
Best practices
- Keep the validation request lightweight so test connection is reliable.
- Prefer idempotent endpoints for delete and create operations when possible, to make retries safe.
- Return deterministic JSON structures so templating is stable.
- Use least privilege credentials.