
JumpCloud SSO Integration Guide
Note on upcoming official JumpCloud integration
TrustWorks is not yet listed as an official application in the JumpCloud App Catalog. Until that listing is available, this guide uses JumpCloud's Custom Application feature to configure SAML 2.0 Single Sign-On with TrustWorks. Functionality is the same as a catalog-listed app — the only difference is that the application must be added manually.
This guide walks you through how to configure JumpCloud Single Sign-On with TrustWorks.
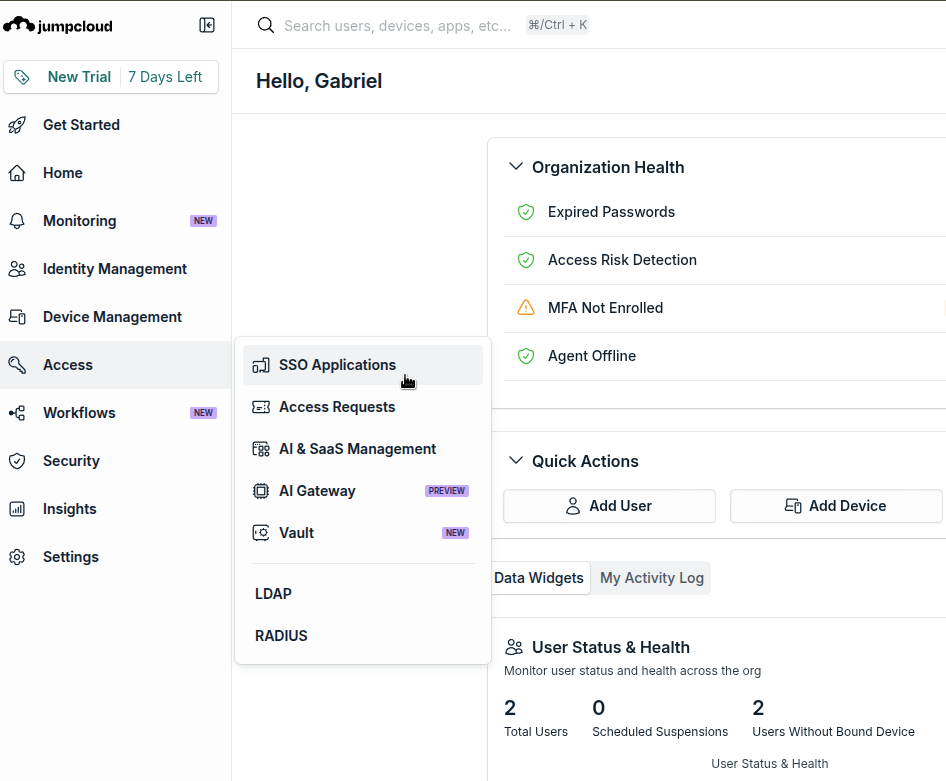
Step 1: Open SSO Applications
In the JumpCloud Admin Console, go to:
Access → SSO Applications
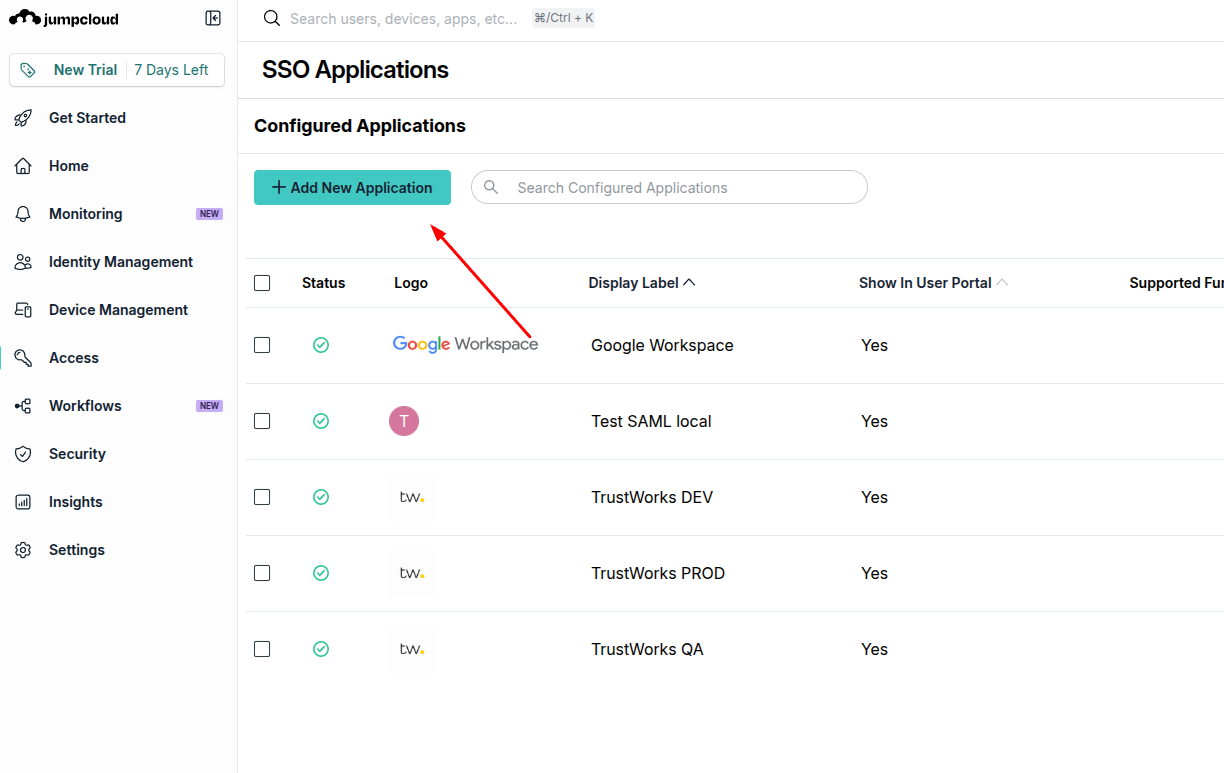
Step 2: Add a New Application
On the SSO Applications page, click + Add New Application.
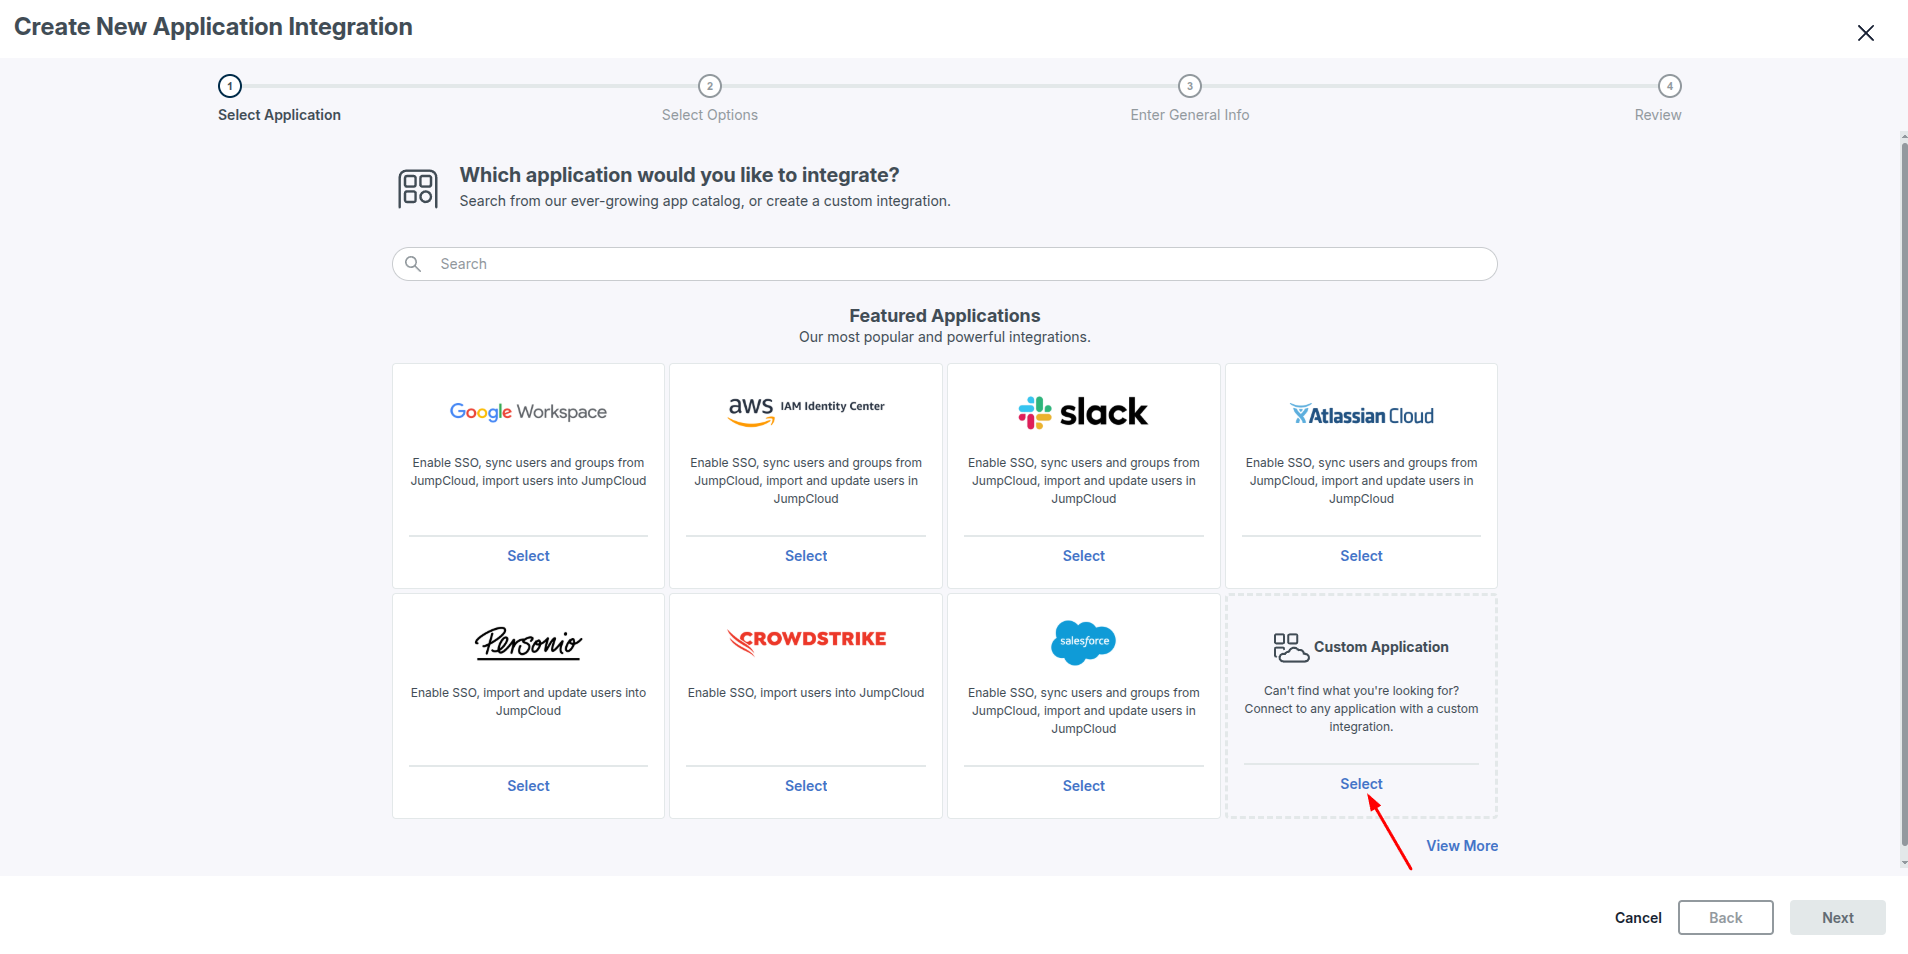
Step 3: Select Custom Application
In the application catalog, scroll to the bottom (or click View More) and select Custom Application.
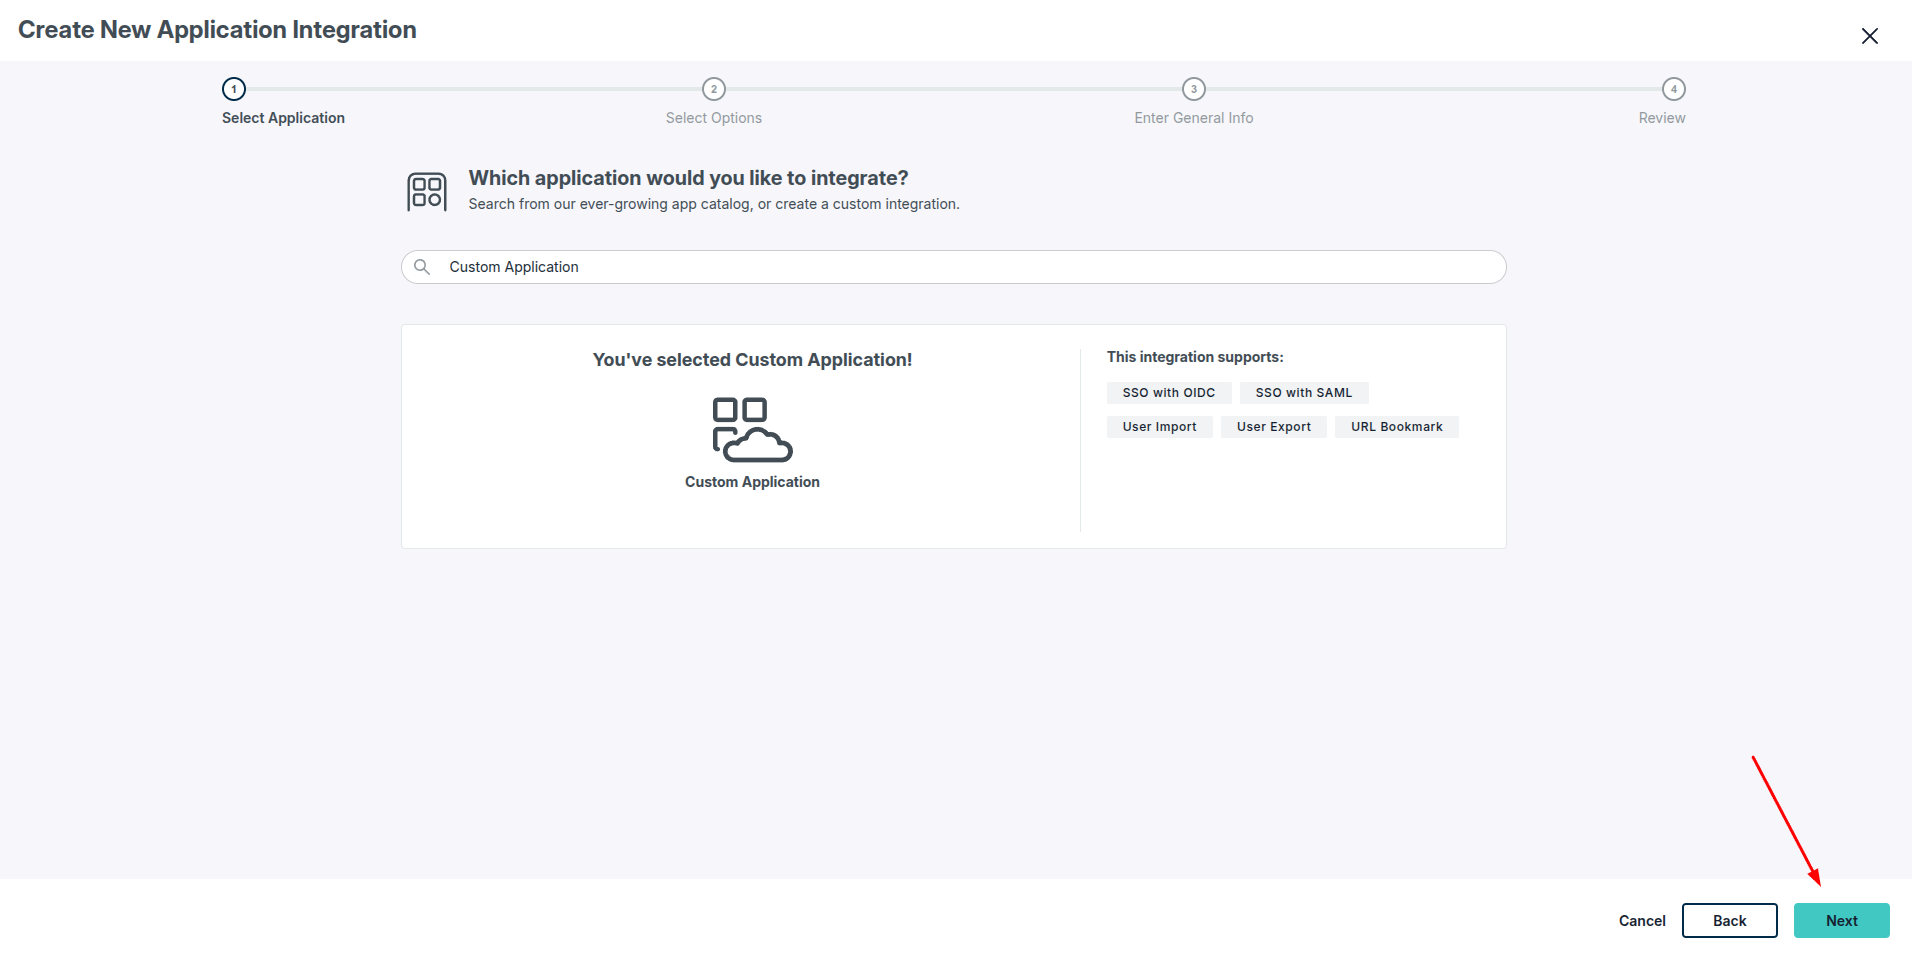
Step 4: Confirm the Application
JumpCloud will confirm that Custom Application supports SSO with SAML, SSO with OIDC, User Import, User Export, and URL Bookmark.
Click Next.
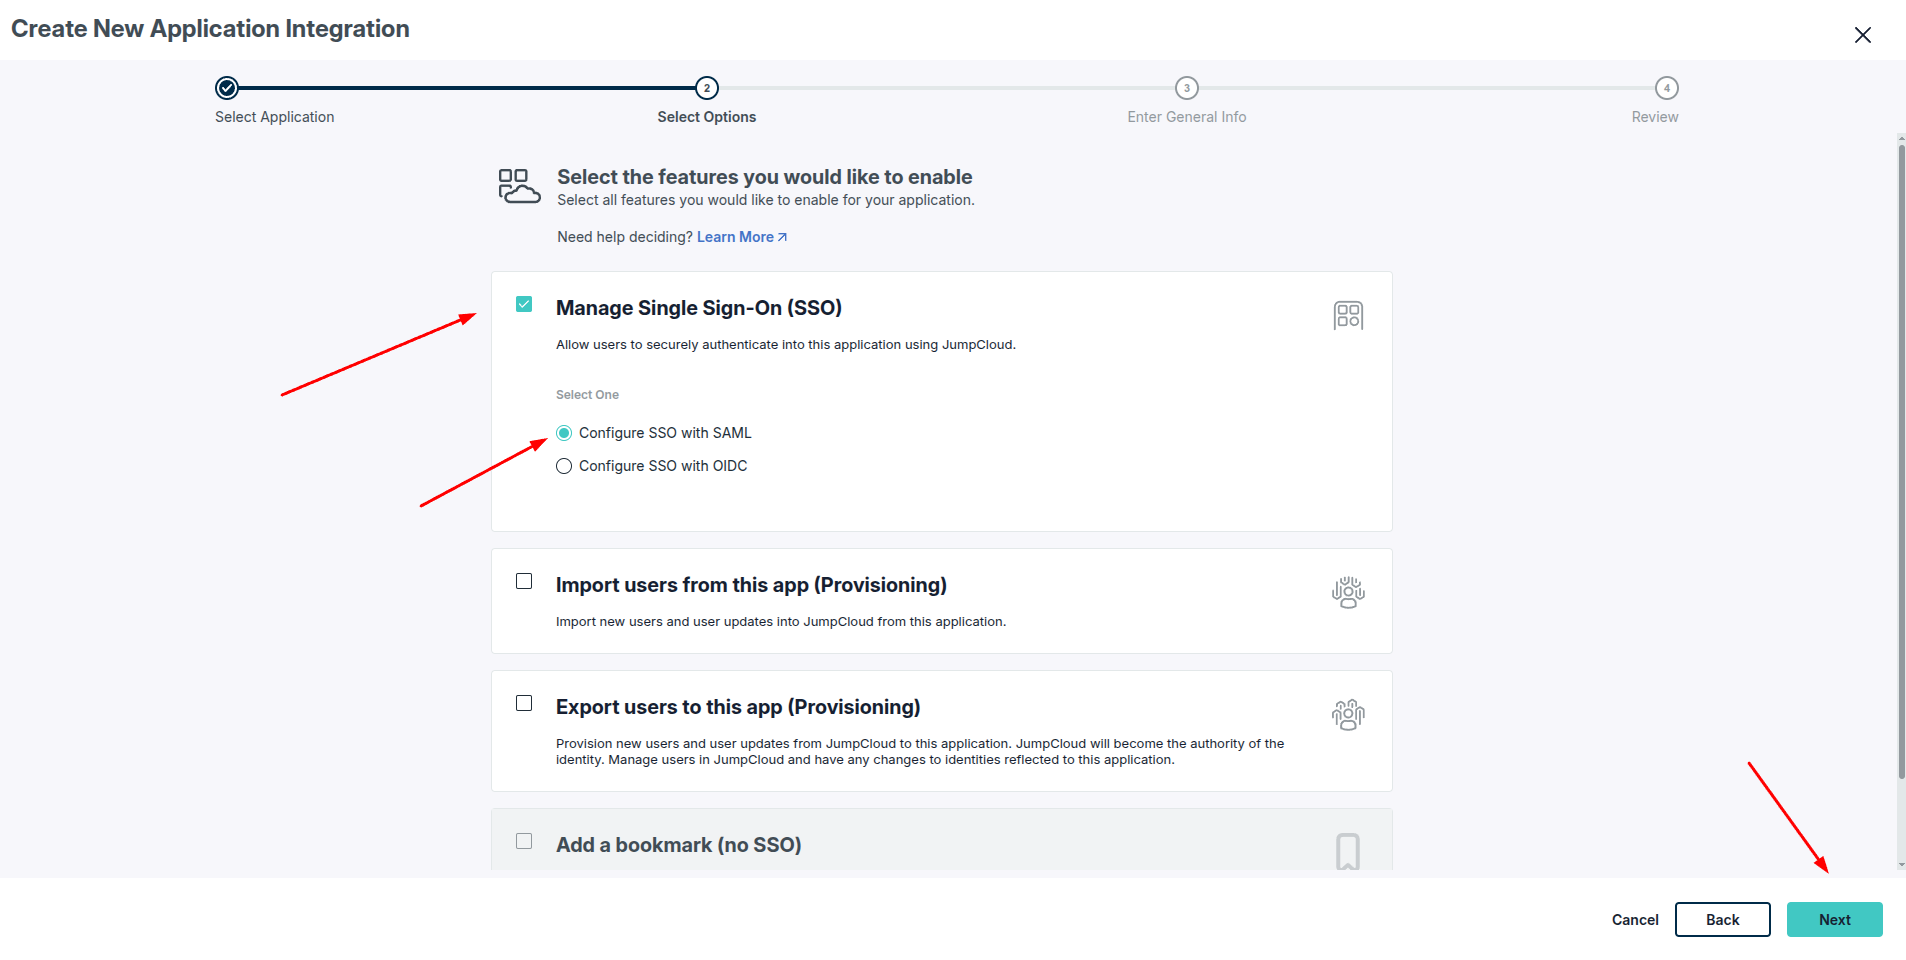
Step 5: Select the Features to Enable
Check Manage Single Sign-On (SSO) and, under Select One, choose:
Configure SSO with SAML
Leave the other options (Import users, Export users, Add a bookmark) unchecked, as TrustWorks does not require JumpCloud provisioning for this setup.
Click Next.
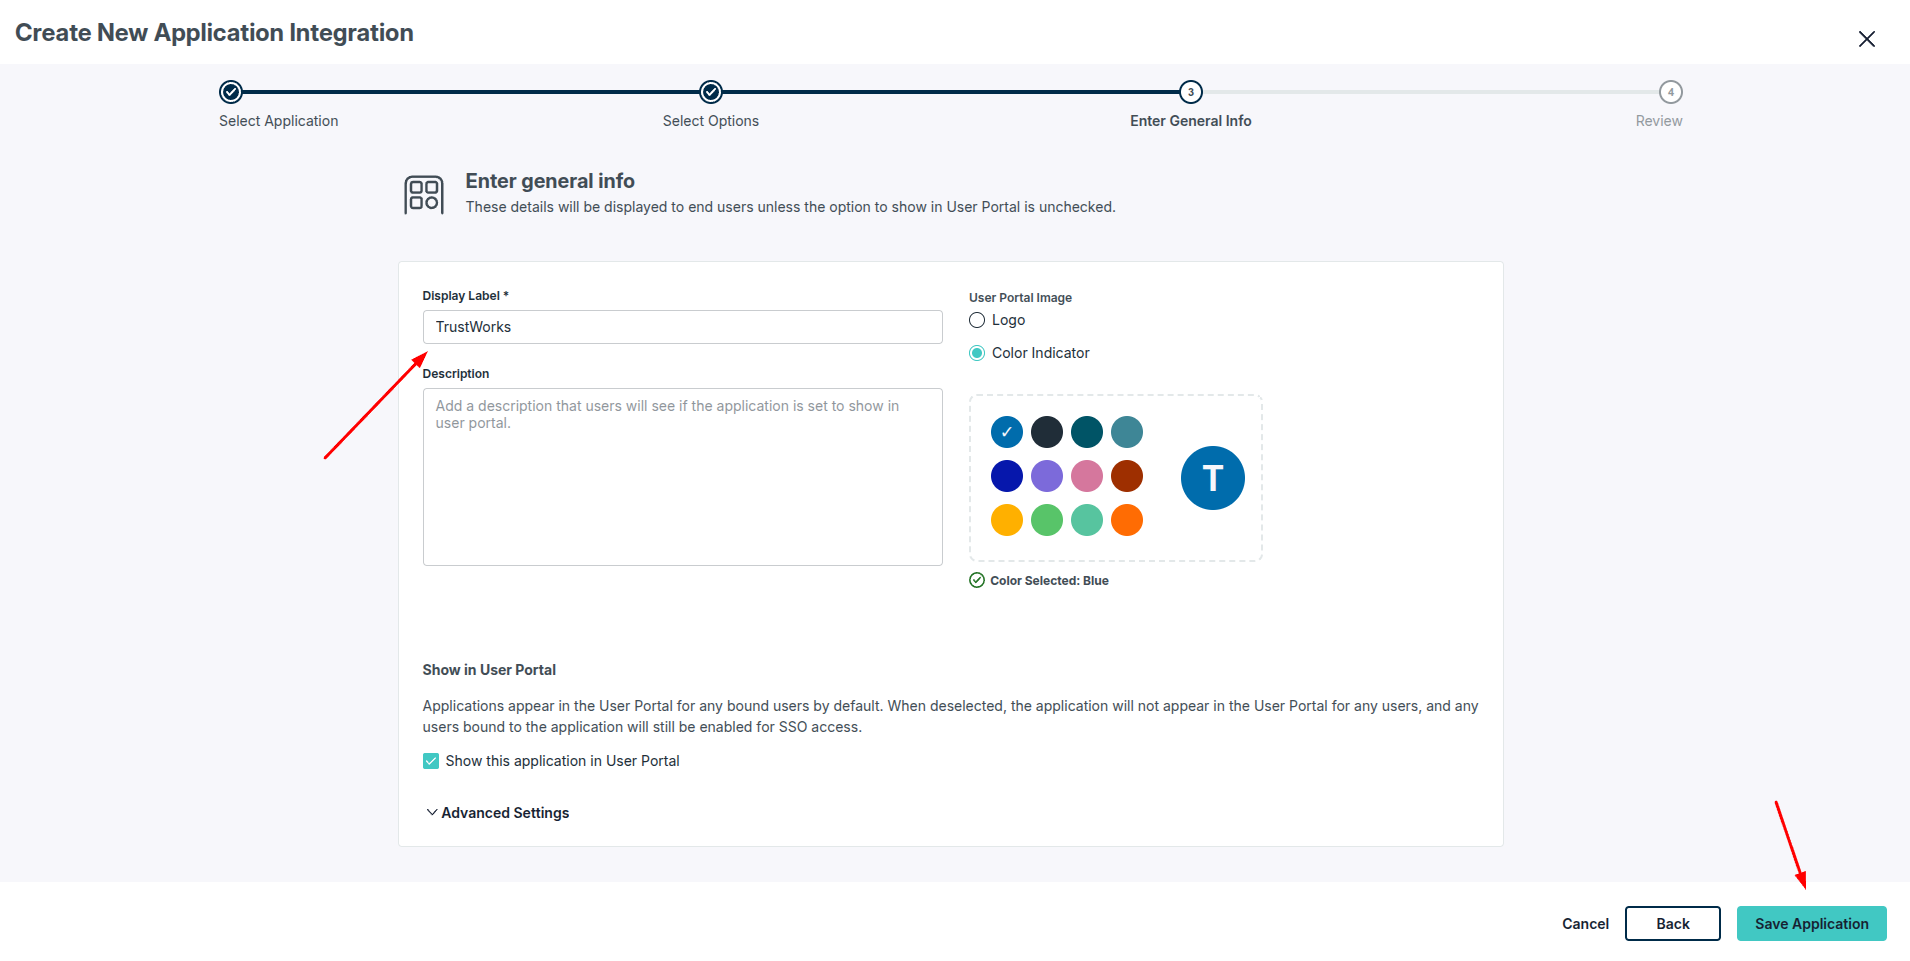
Step 6: Enter General Info
Give the application a Display Label, for example:
TrustWorks
Optionally add a description and choose a User Portal Image (Logo or Color Indicator) so end users can easily identify the app in their JumpCloud portal.
Click Save Application.
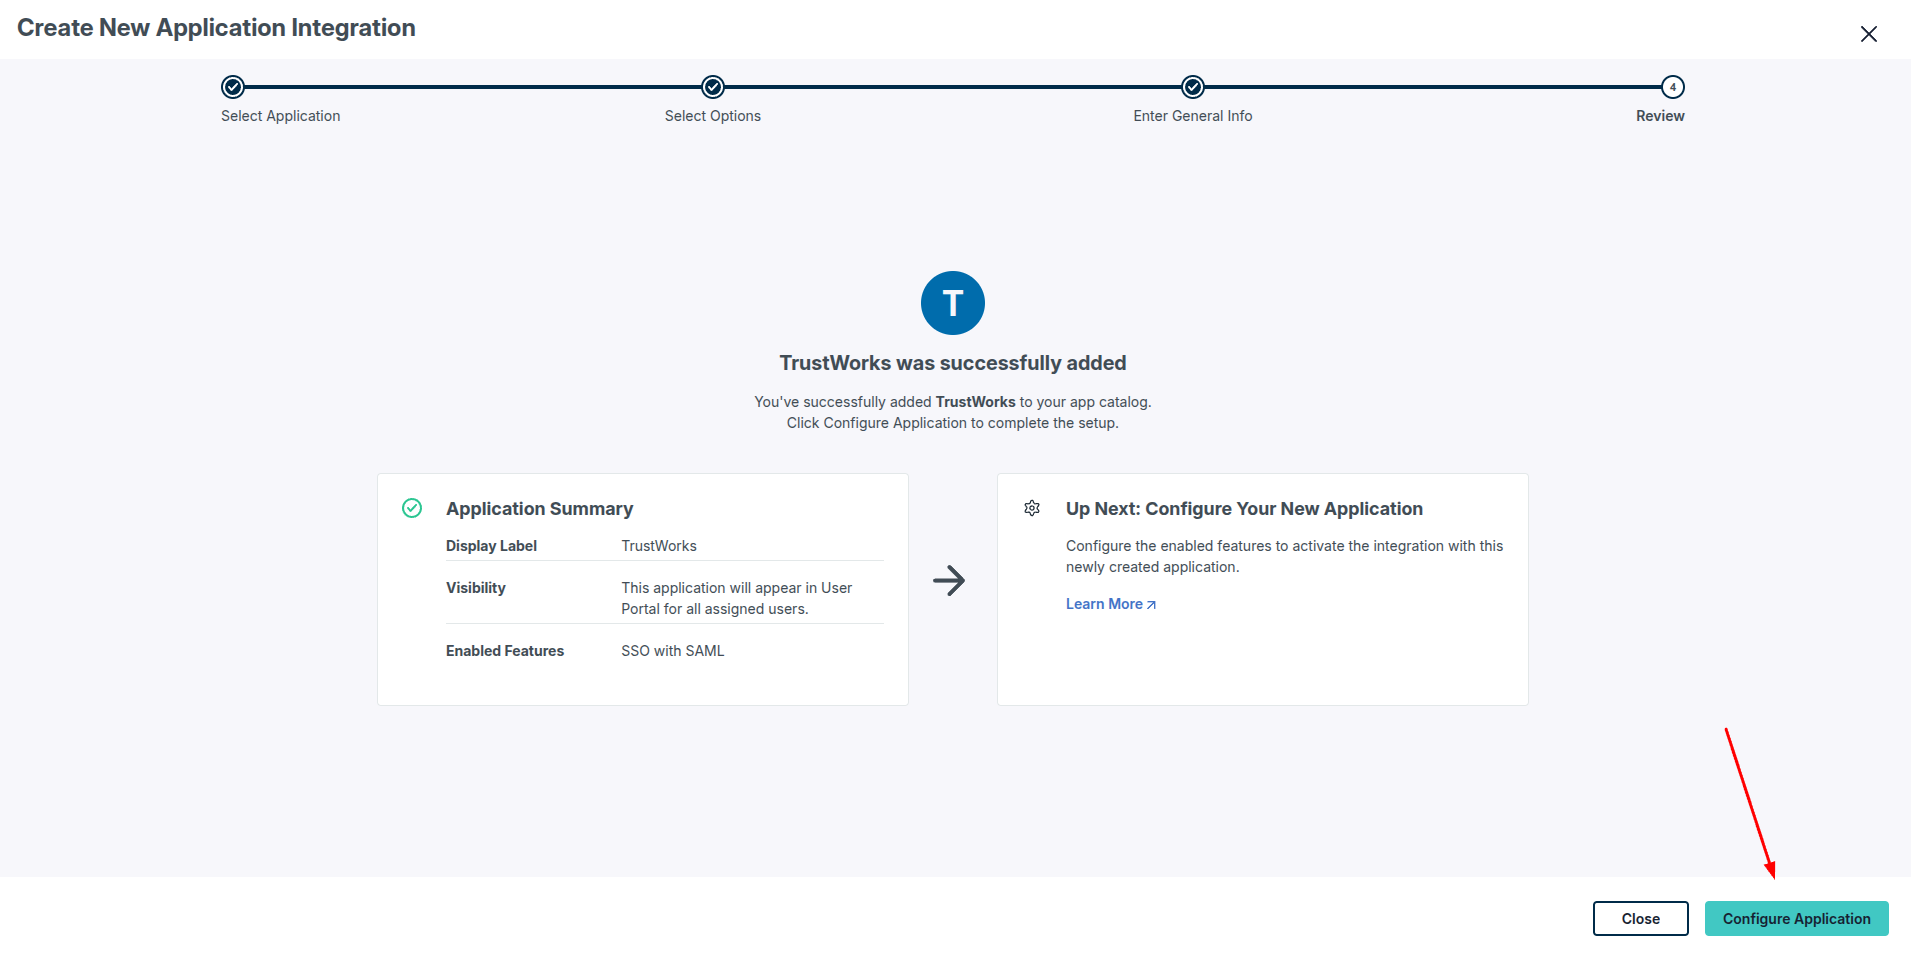
Step 7: Configure the Application
Once the application is created, JumpCloud confirms it was added successfully and shows an Application Summary with the enabled features (SSO with SAML).
Click Configure Application to continue setting up the SAML connection.
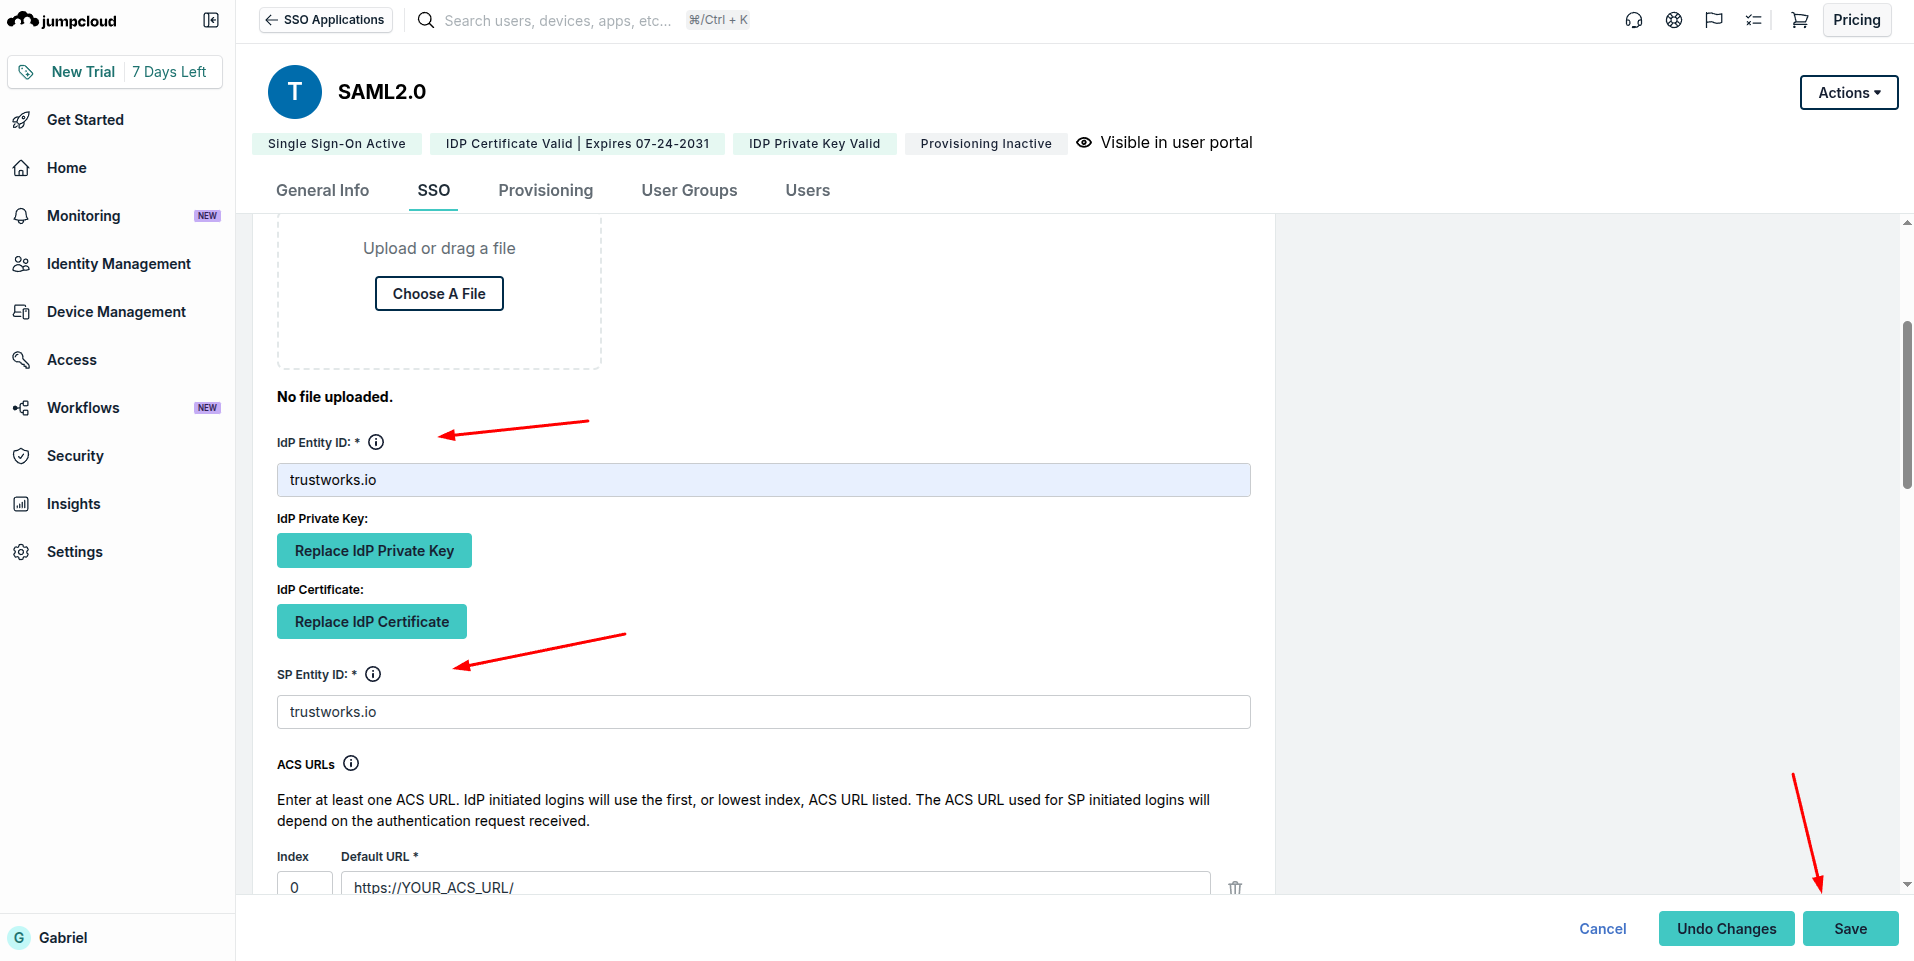
Step 8: Configure the Identity Provider (IdP) and Service Provider (SP) Entity IDs
On the SSO tab, enter the following values:
- IdP Entity ID:
trustworks.io - SP Entity ID:
trustworks.io
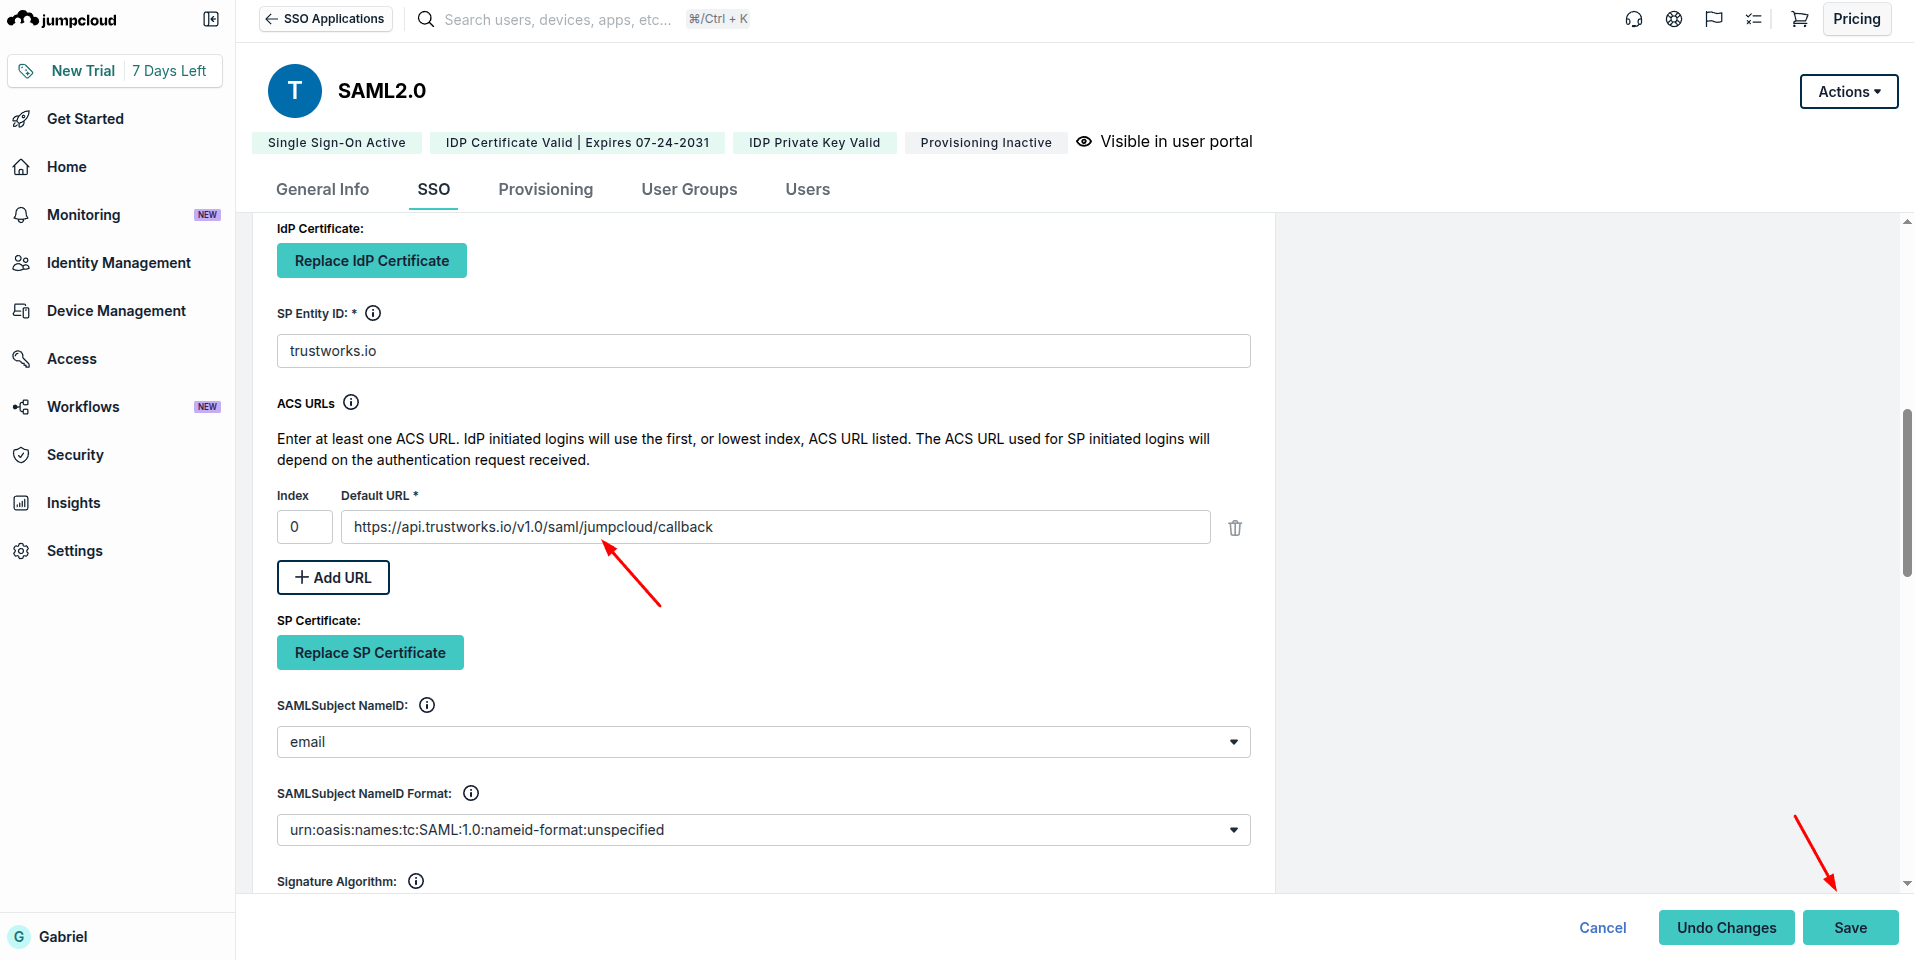
Step 9: Configure the ACS URL, SP Certificate, and NameID Settings
Under ACS URLs, add:
- Default URL:
https://api.trustworks.io/v1.0/saml/jumpcloud/callback
Under SAML Subject NameID, select email.
Under SAML Subject NameID Format, select:
urn:oasis:names:tc:SAML:1.0:nameid-format:unspecified
You can leave the SP Certificate and Signature Algorithm fields at their defaults unless your organization requires a custom SP certificate.
Step 10: Review the Login URL and Copy the IdP SSO URL
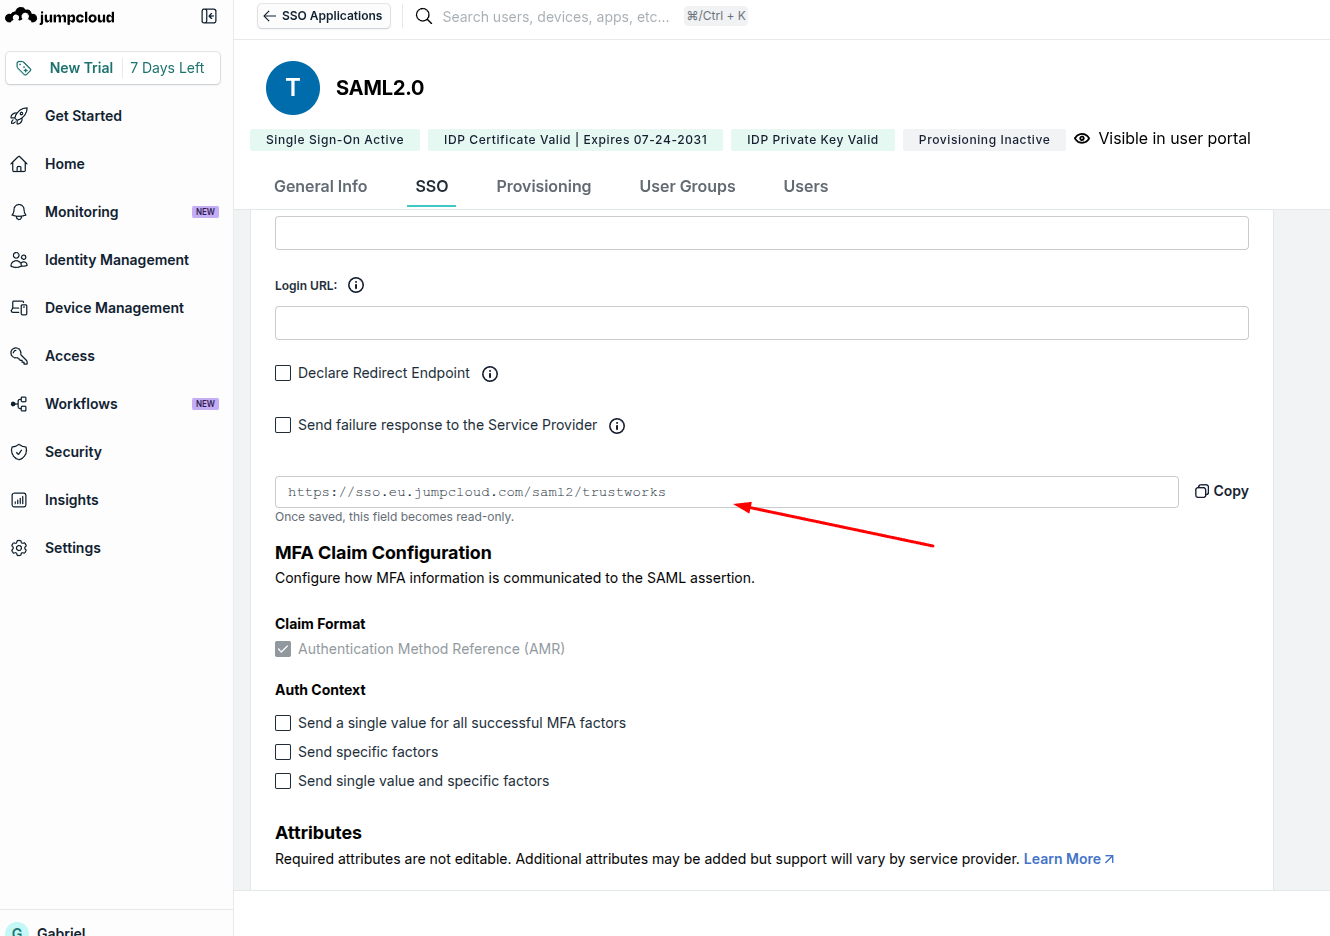
Scroll down to review the Login URL and MFA Claim Configuration sections. These can be left at their default values for a standard integration.
Once you click Save (see Step 12), JumpCloud generates an IdP SSO URL in the field below the login settings — for example:
https://sso.eu.jumpcloud.com/saml2/trustworks
Click the Copy button to copy this URL — you will need to send it to TrustWorks in Step 14.
Step 11: Configure Attribute Mapping
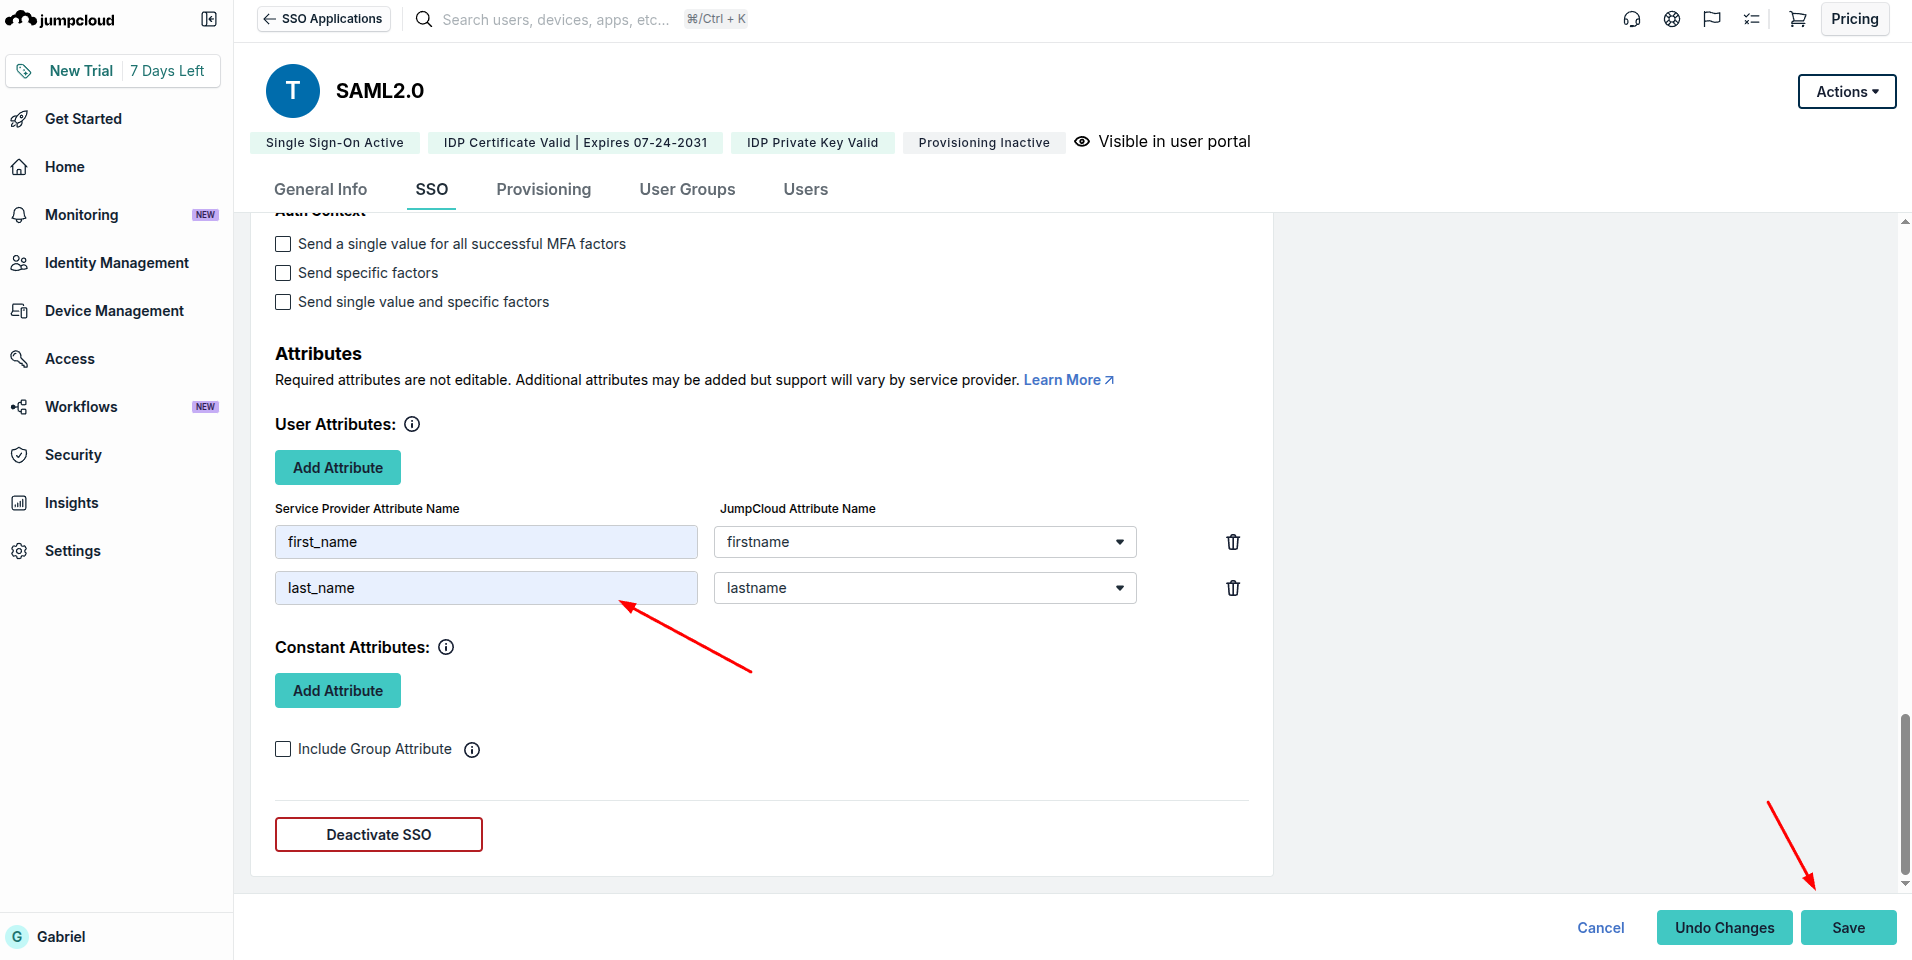
Still on the SSO tab, scroll to the Attributes section and click Add Attribute under User Attributes to map the following:
| Service Provider Attribute Name | JumpCloud Attribute Name |
|---|---|
first_name |
firstname |
last_name |
lastname |
Leave Constant Attributes and Include Group Attribute unchecked unless your integration requires them.
Step 12: Assign User Groups
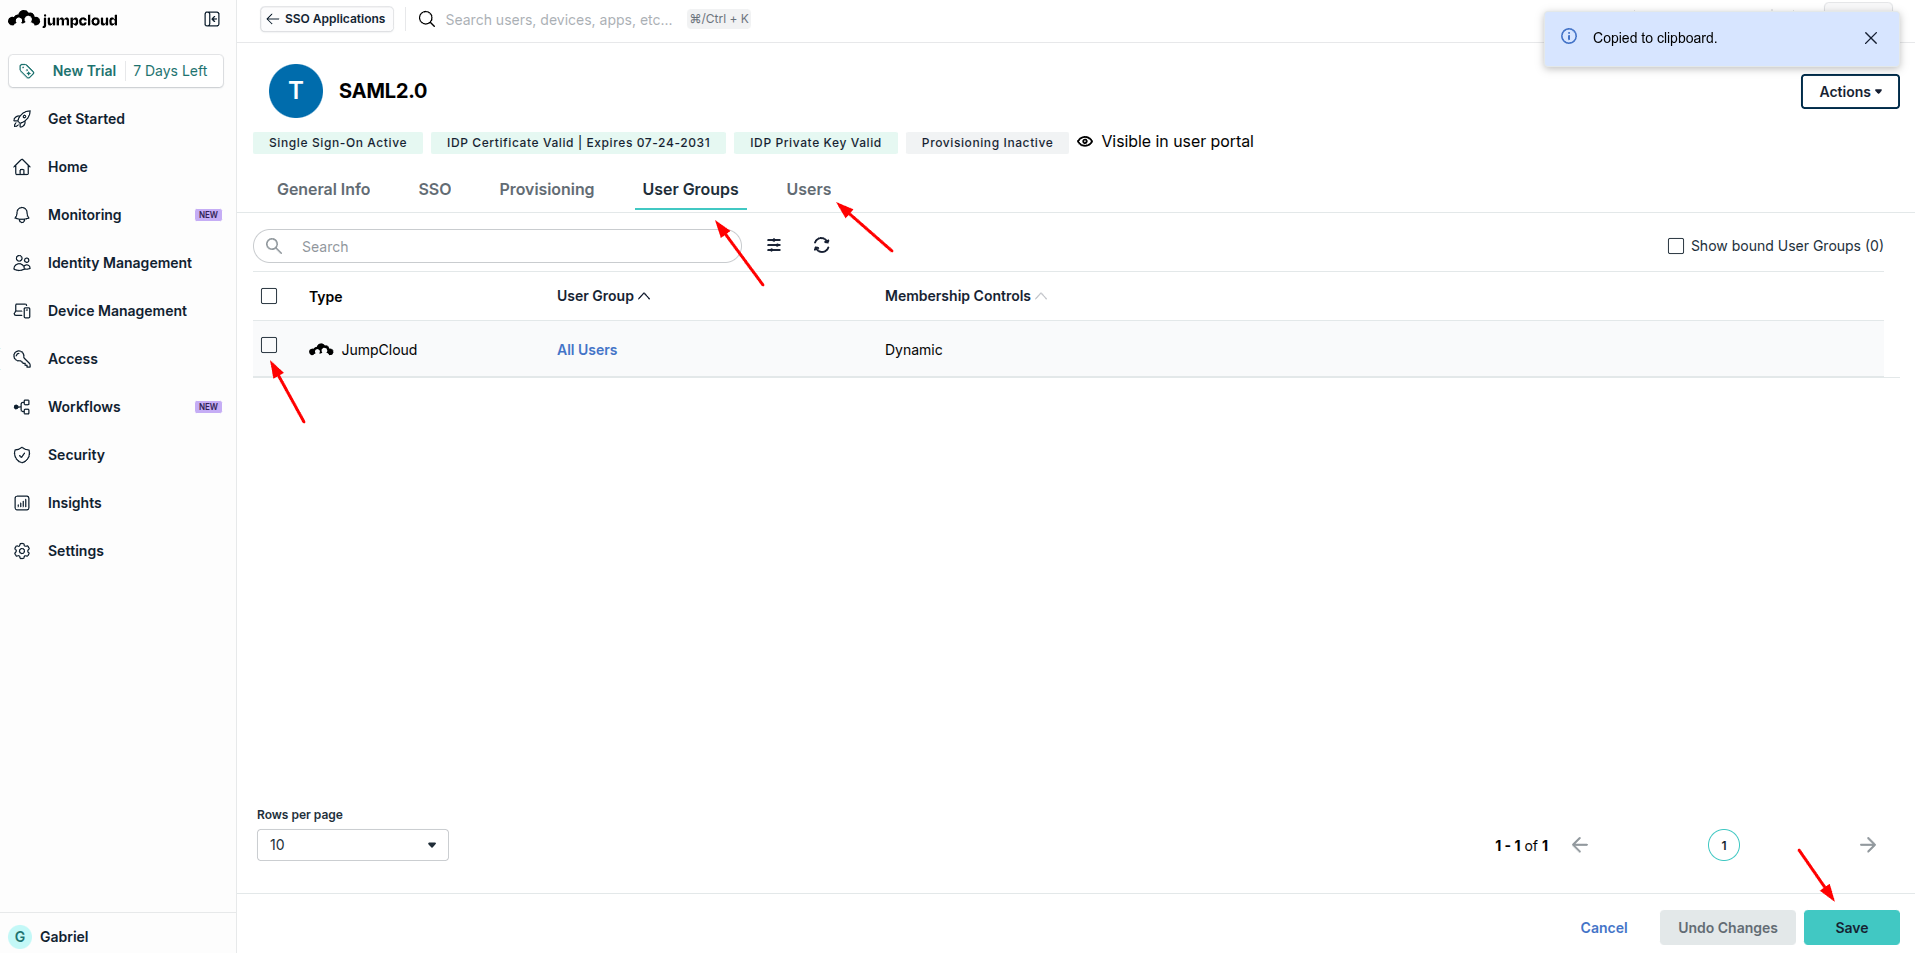
Go to the User Groups tab and select the group(s) that should have access to TrustWorks (for example, All Users).
Click Save to apply the SSO configuration and group assignment.
Step 13: Copy Metadata URL information
Go back to the SSO tab and, under JumpCloud Metadata, select:
- Copy Metadata URL (copies a link to the metadata)
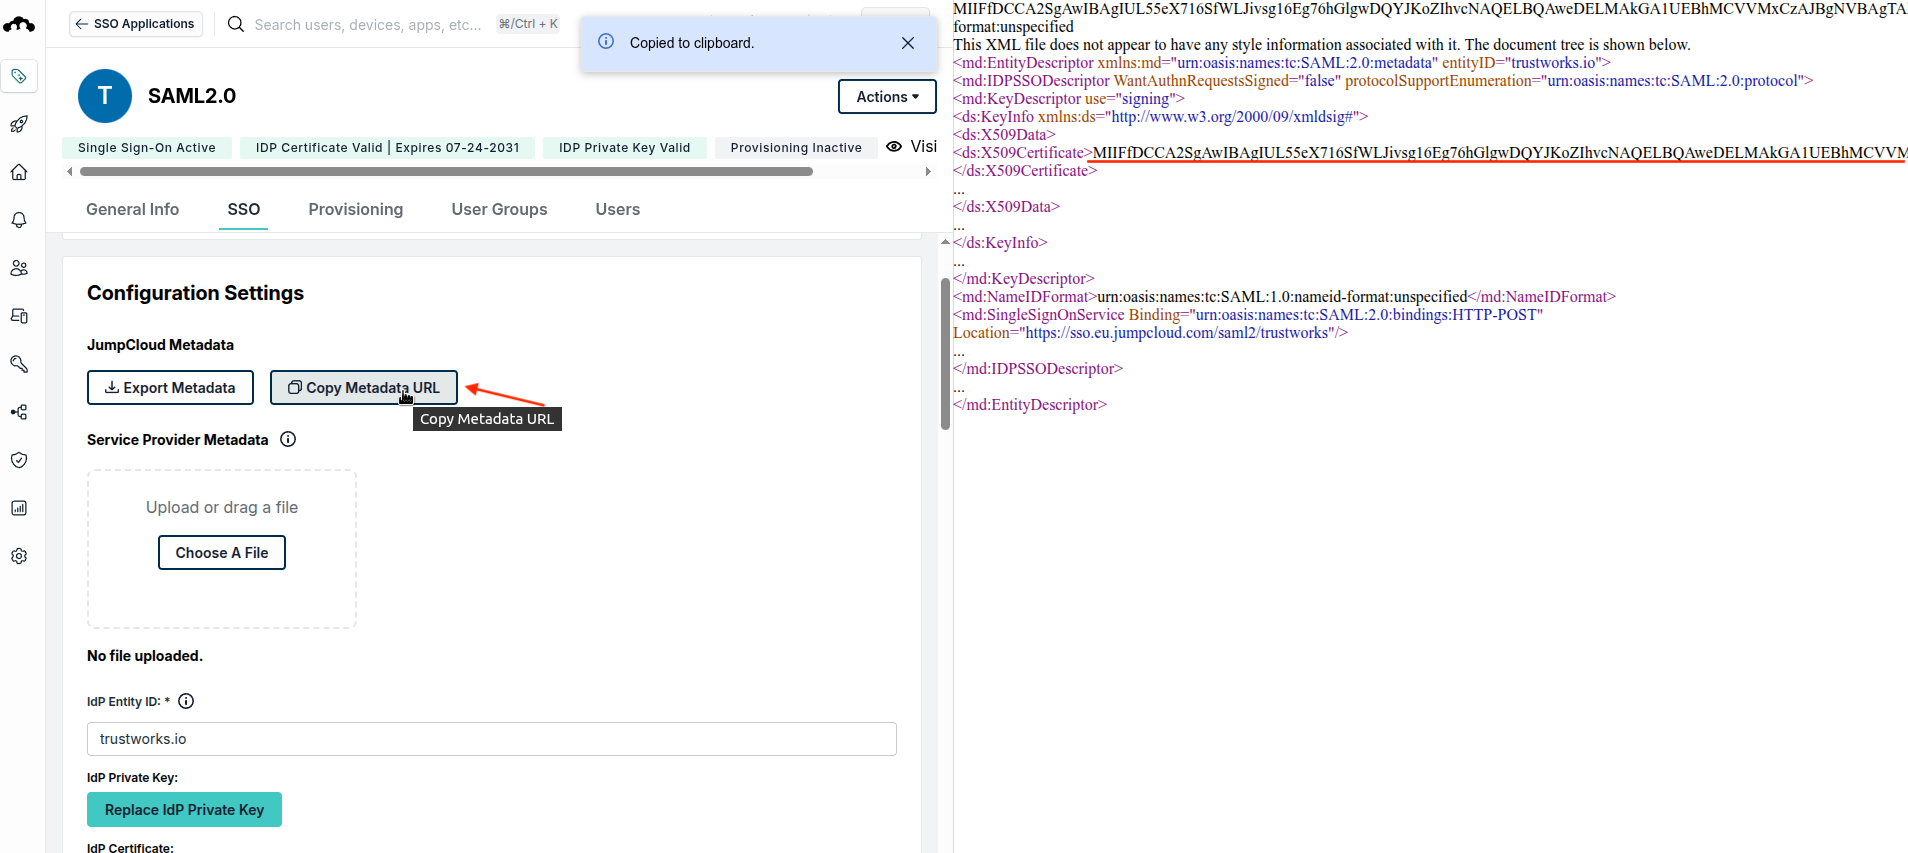
Paste the value copied into a new tab in the browser, and it will open the information available on the right side of the picture above.
It's important to copy the information that appear between both the <ds:X509Certificate> .
Step 14: Configuring the integration in TrustWorks
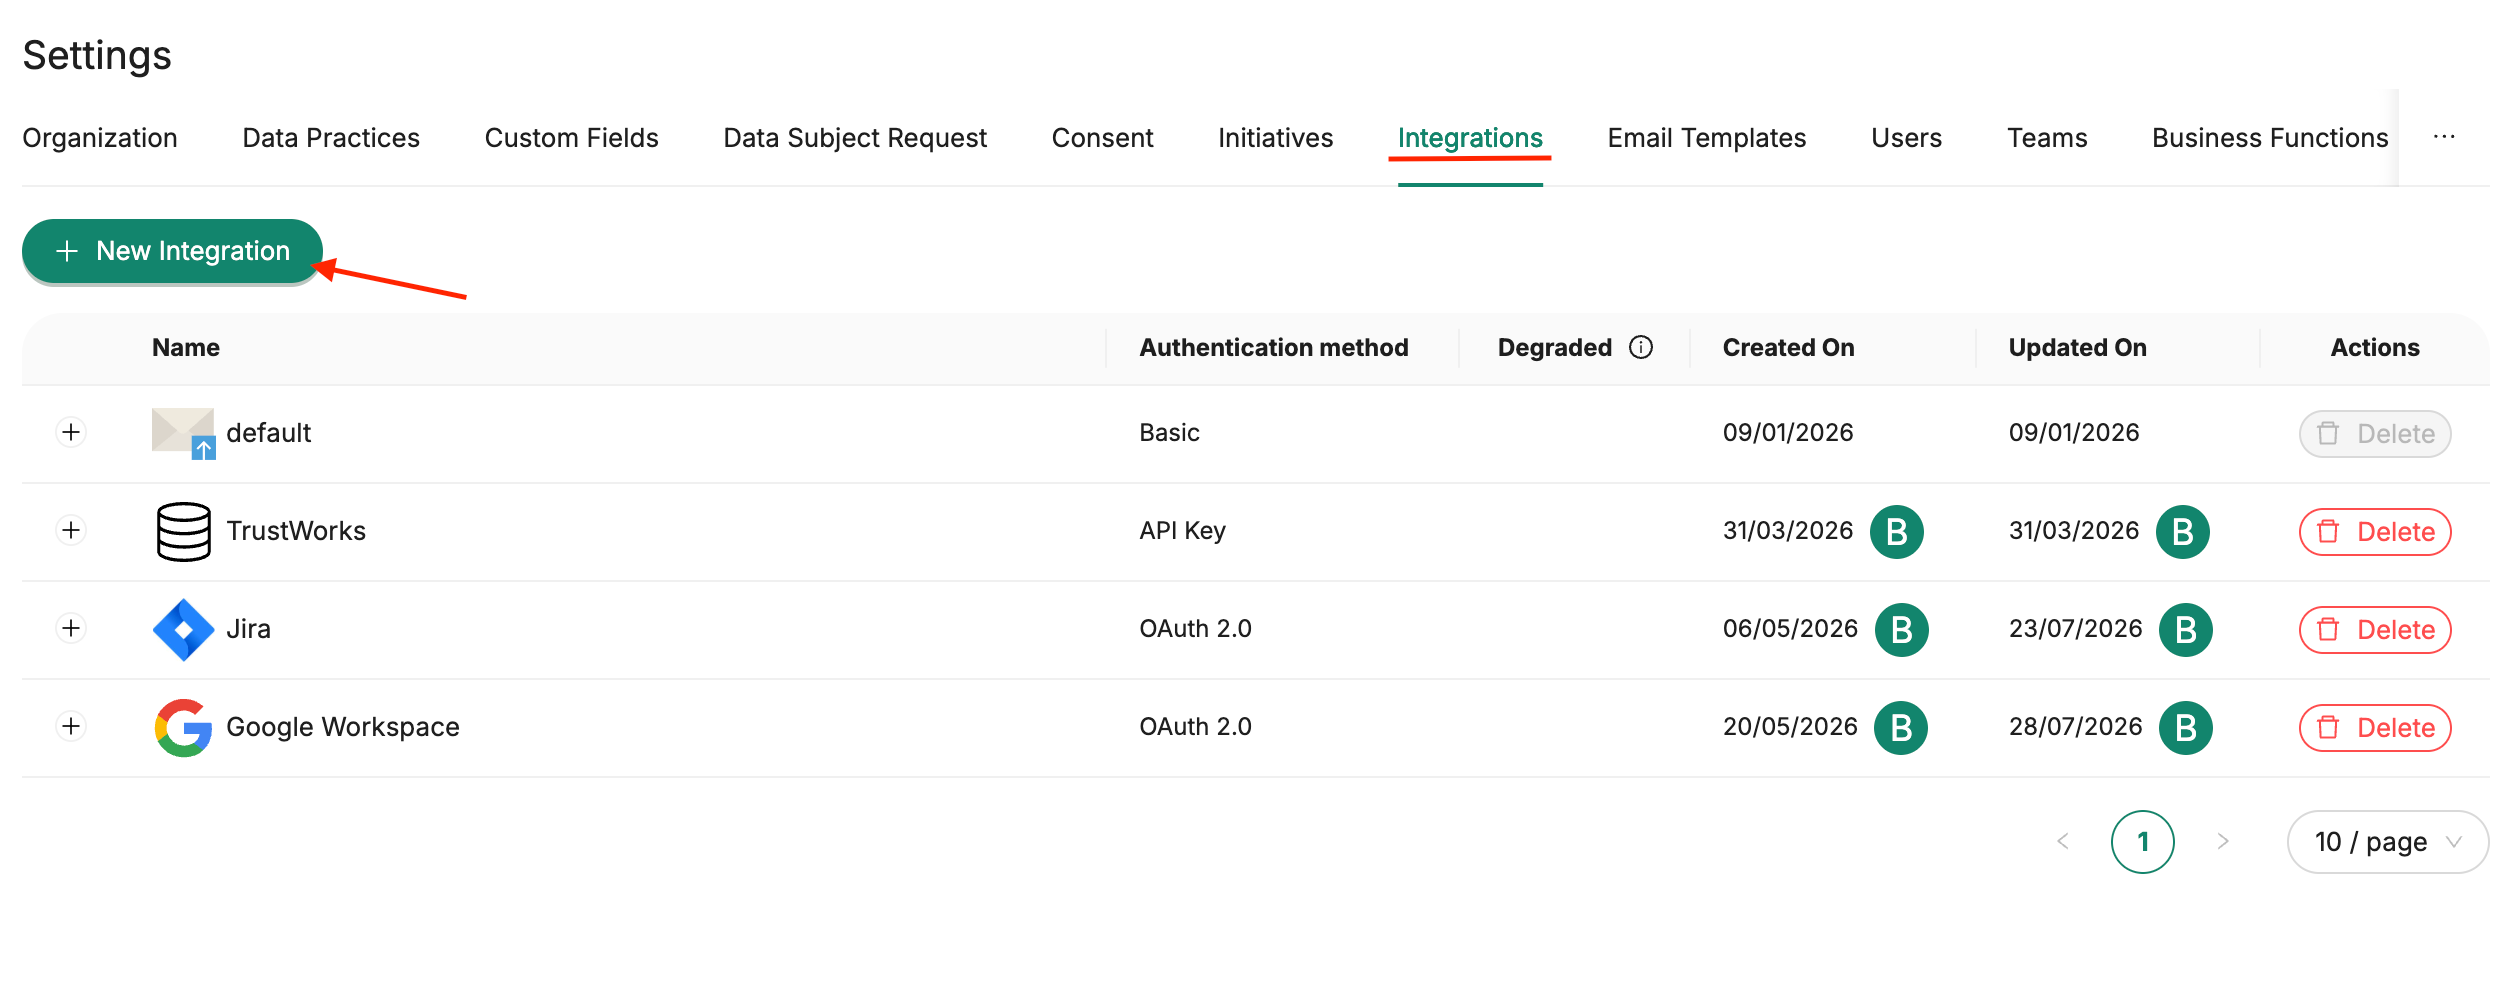
Access your environment in TrustWorks, go to Settings > Integrations and select the button to add a new integration
Search for the JumpCloud integration and select the Authentication method as SAML.
- The Single Sign-On URL is the endpoint that you copied in the step 10
- The x.509 certificate will be the same that you copied from the step 13
- The Identity Provider Entity ID will be the same as the Service Provider Entity ID (as mentioned before):
trustworks.io
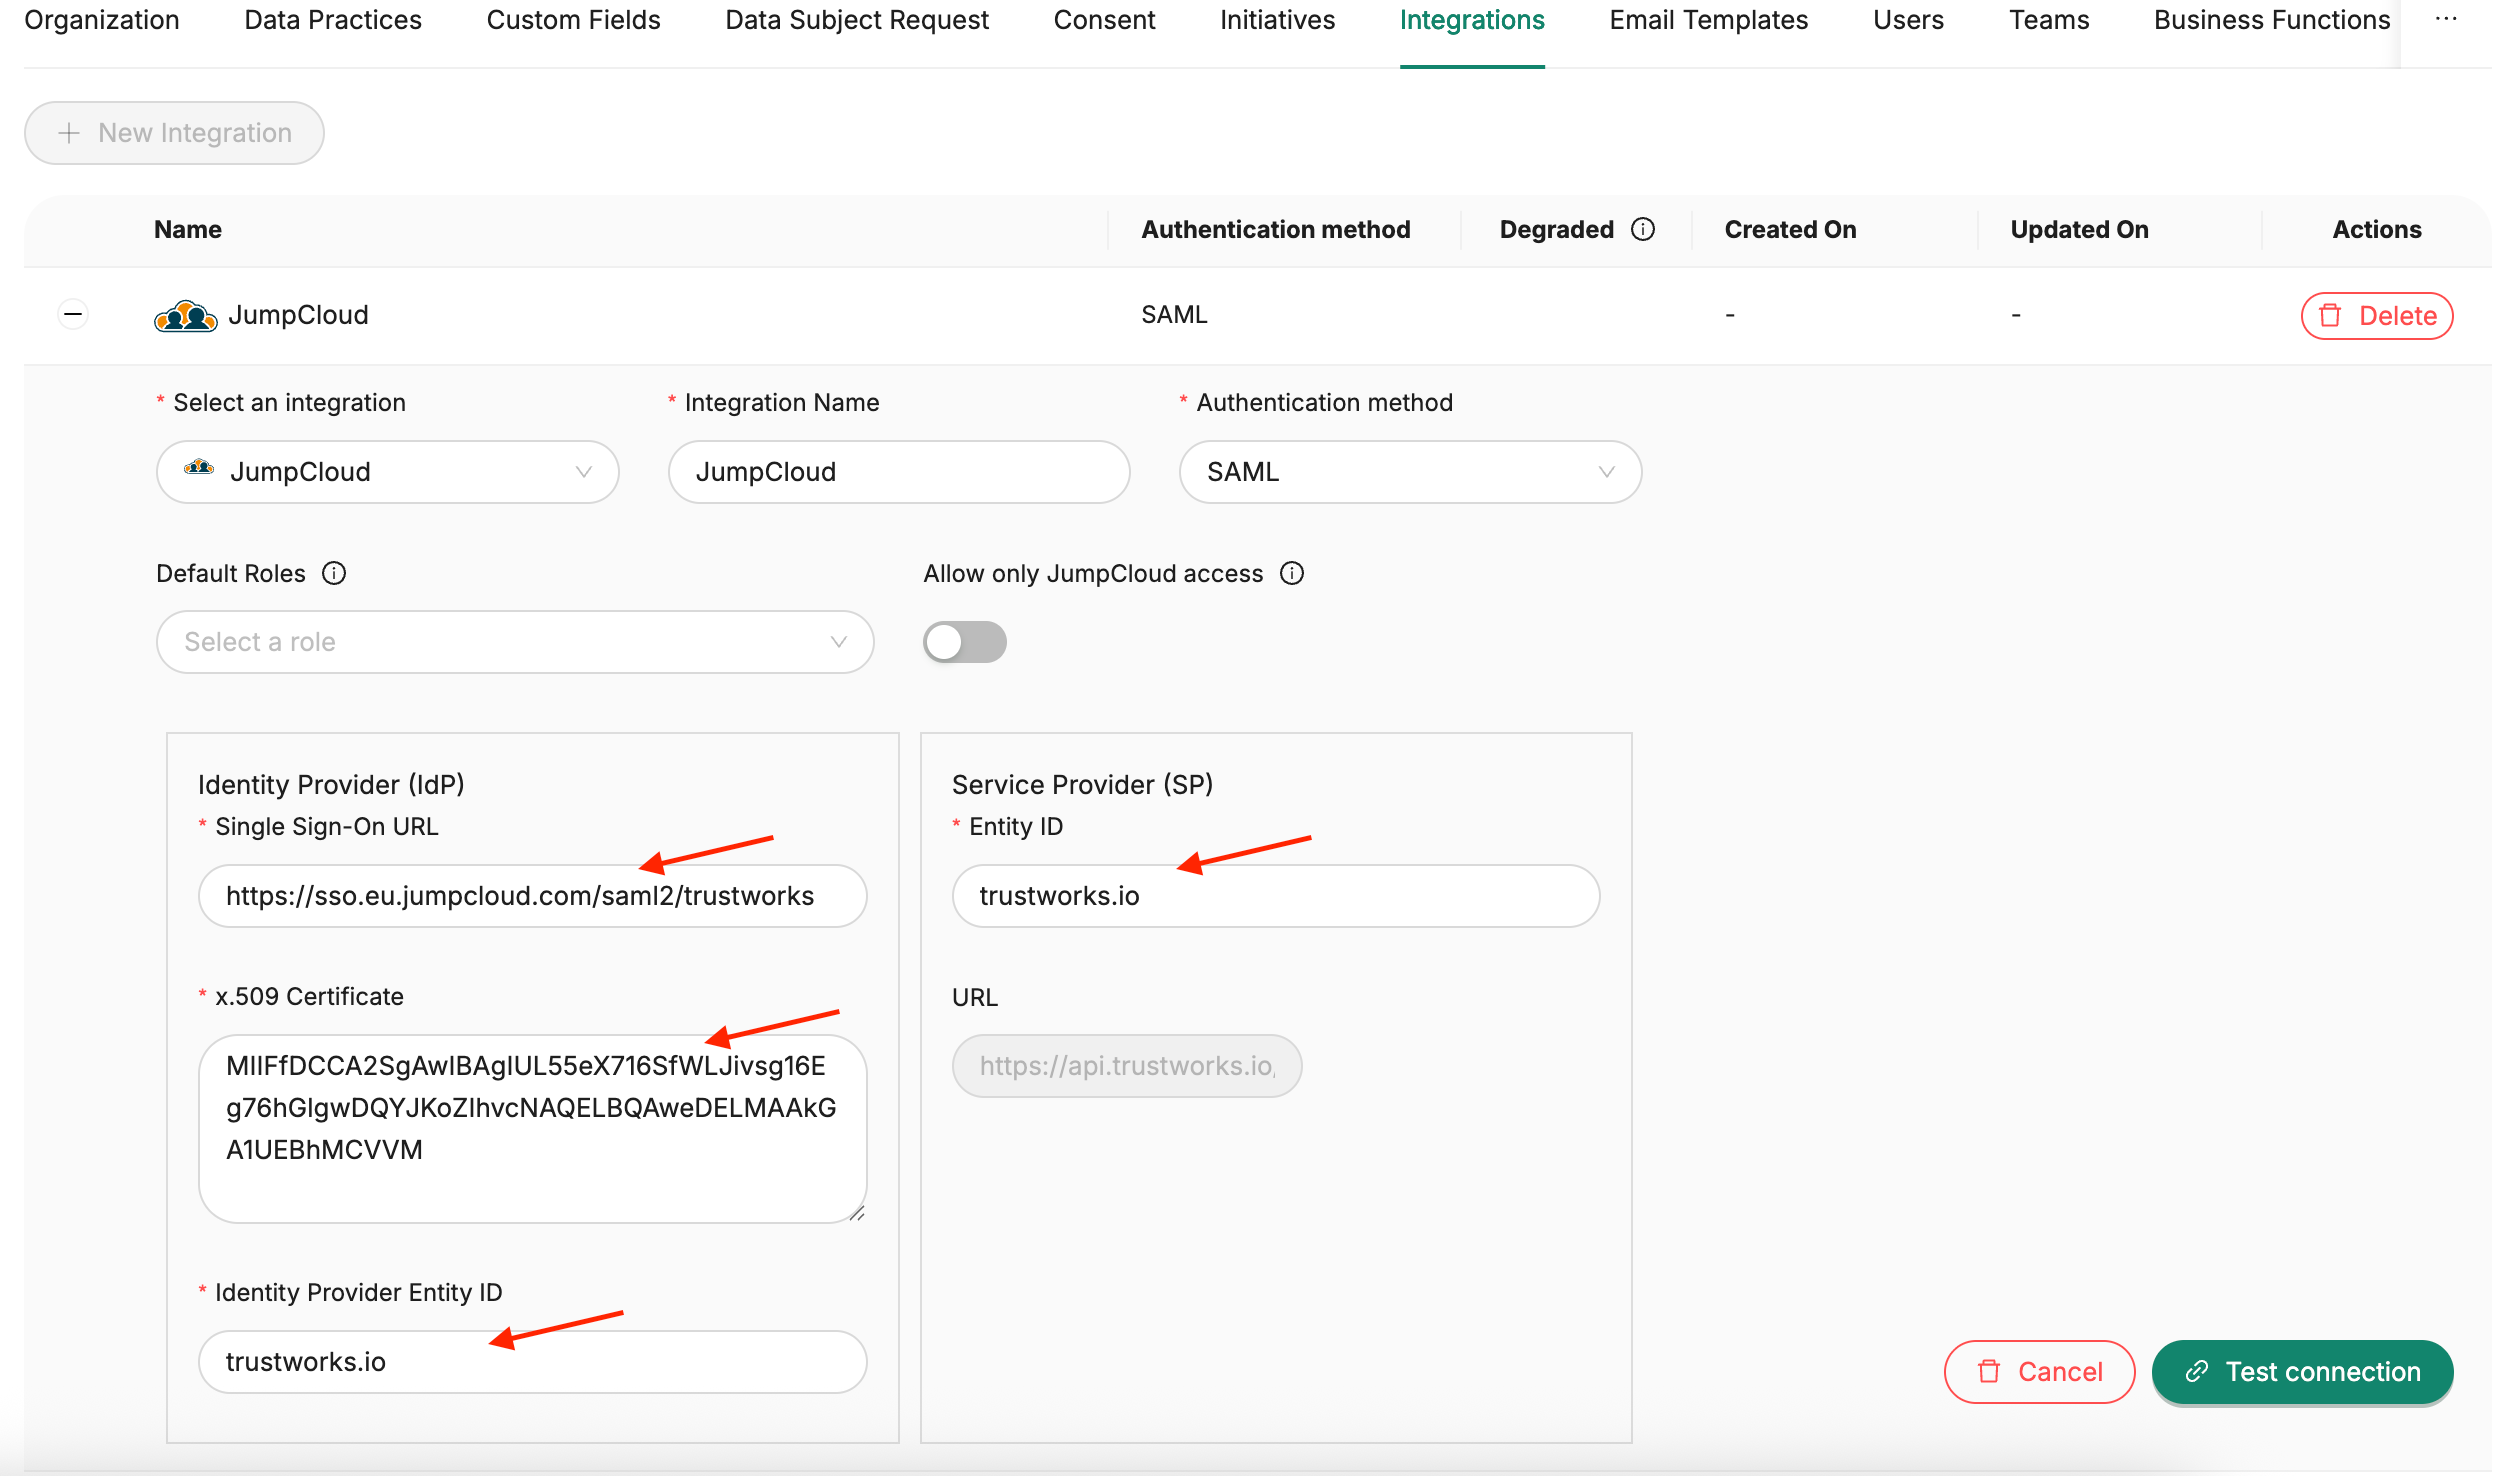
After clicking the Test connection button in TrustWorks and receiving the confirmation that everything is correct, save and test an actual login with an assigned JumpCloud user.
Optional Additional Settings
- Default Role: Leave empty to assign Contributor to new users
- Enable "Allow only JumpCloud access" if you want to disable TrustWorks password login
- ⚠️ enabling this option would allow only login into TrustWorks through JumpCloud. The ability to login through email and password won't be able available.
After filling all the necessary fields, click on the Test connection button, to make sure that everything is correct
You're done!
The integration should now be active. If you run into issues, contact your TrustWorks admin.